sabnzbd / sickbeard / couchpotato pbi's - a noobie's guide
Hi everyone,
someone asked about a guide for the installation. Well, since I also rely on guides a lot and they helped me a lot getting familiar with FreeNAS plus getting all the great usenet applications up and running, I thought I’d write down my steps. I can recommend doing this yourself as well, as not every environment is the same and if you run into errors, make sure to also note what went wrong and how you fixed it. Saves a lot of time and headaches when things suddenly don’t work anymore and you have to redo everything. I’m not sure if this is good enough/worthy of an own thread, so I’ll just post it as reply here.
I usually work with Windows and am not very familiar with Unix altogether. Also, despite working as an administrator, I don’t feel like being on the same level as others around here, so bear with me. This makes me a little irresponsible, when I choose a setting just from what it sounds like instead of looking up what it actually does.
So I’m clearly stating here that I am not responsible for whatever you do, you’re the one in front of the keyboard!!! ;-)
My FreeNAS build isn’t important yet, which is why I keep remaking it and don’t mind if I should lose any data. Before playing around, always make sure you have backups!
As a last note, I just did this to share and in hopes of helping someone. I am too lazy to do fancy formatting of this guide and I probably won’t edit much after posting this. Due to my laziness, I didn’t feel like posting any screenshots (I do have some in my word document – I might consider creating a PDF). All steps should be clear. If not, let me know. Also, if there are mistakes or anything else, just drop me a line. I wish to learn more and want things to run stable. I’m glad to answer questions, but again: I am very lazy and I need a lot of time working on my new ESXi-Host and FreeNAS-Server. Though I’d like to write even more, I’ll spare you the reading. Here goes….
Links worth reading:
http://anichin.com/blog/2012/05/installing-freenas-to-usb-stick-simpler-way/
http://forums.freenas.org/showthread.php?6221-sabnzbd-sickbeard-couchpotato-pbi-s/ (Yay! :D)
http://protosd.blogspot.de/2012/03/quick-guide-to-using-plugins-video-with.html
Download IMG file
http://sourceforge.net/projects/freenas/files
Download Image Writer for Windows
https://launchpad.net/win32-image-writer
Install FreeNAS...
First boot – setting static IP for FreeNAS
@Server: 1. Configure Network -> Reset? -> No -> DHCP? -> No
Enter IP (f.e.: 192.168.1.10/24 – this is the one you use to manage/connect to FreeNAS and not the plugins! We’ll specify a different IP for that later.)
Connect to the specified IP with browser
Changing webinterface to encrypted communication:
Settings -> General -> set Protocol to HTTPS and change port if desired (remember to reconnect using https and the new port after saving)
Create a password for the admin account:
Account -> Admin Account -> Change Password (I chose to have the root password changed as well)
Network settings:
Network -> Global Configuration - since we changed to a static address, we’ll have to manually enter some values. Add your router’s IP as default gateway and also as “Nameserver 1” – I used my dynDNS as domain and added the openDNS-Servers (208.67.222.222, 208.67.220.220).
Activate the following services:
Services -> Control Services FTP, SSH – activate „login as root with password“, if you wish. i also chose “Enable SSL/TLS” for FTP. You should now be able to connect using putty and WinSCP or any other tool of your choice.
Adding a volume to host your files:
Storage -> Volumes -> Volume Manager
You are now presented with available hard disks. Select the ones you want (I don’t know if you can select multiple, as I only have had one so far) and choose a name. I chose ZFS as filesystem und “Force 4096 bytes sector”. I have to admit that I don’t know what forcing that does and if it’s good or bad. Maybe someone can enlighten me ;-)
Creating a user to work with:
So, one of the first things you are told is to never work with the root or Administrator account. So we’ll add a user here.
Use WinSCP to connect and create a homedirectory for your user (something like this: /mnt/%VOLUMENAME%/% USERNAME%).
Account -> Users -> Add User
Specifiy: Username, Home Directory (we just created that ;-)), Full Name, password
Add your user to the group with the same name – i don’t know why this group is created automatically and I don’t understand why the user isn’t added to this group by default….
Account -> Groups -> View Groups -> %USERNAME% -> Members -> Add %USERNAME% to selected
Make the user owner of its own home folder – connect using putty, navigate to folder and change permission:
[root@freenas] ~# cd /mnt/%VOLUMENAME%/
[root@freenas] /mnt/FreeNAS# chown %USERNAME% %USERNAME%
Configuring Plugins
Get the latest Plugin Jail:
http://sourceforge.net/projects/freenas/files/FreeNAS-8.2.0/RELEASE/x64/plugins/
FreeNAS-8.2.0-RELEASE-x64.Plugins_Jail.pbi
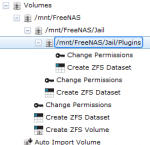
Creating ZFS datasets:
Storage -> Volumes -> View Volumes -> Create ZFS dataset (on your desired volume – I used default settings):
1x „Jail“ and 1x „Plugin“ as subset of „Jail“
This is what it should look like (FreeNAS obviously is my volume name):
FreeNAS /mnt/FreeNAS
FreeNAS/Jail /mnt/FreeNAS/Jail
FreeNAS/Jail/Plugins /mnt/FreeNAS/Jail/Plugins
Installing the plugins system:
Services -> Control Services -> Plugins Settings (the wrench icon next to “Plugins”)
Step 1 – leave default
Step 2:
Plugins jail path: This is the “Jail” dataset we just created (in my case /mnt/FreeNAS/Jail)
Jail Name: Call it whatever you like
Jail IP address: This will be the IP you will be using to access the webinterfaces of the plugins/programs (sabnzbd and so on)
Netmask: accordingly
Plugins archive path: This is the “Plugins” dataset we just created (in my case /mnt/FreeNAS/Jail/Plugins)
Step3: Browse to wherever you downloaded the Plugins pbi and finally upload.
Once that is done, feel free to switch on the Plugins service.
You can check the result by connecting via SSH and entering:
“jexec 1 csh” – you should now be inside your Jail, “ifconfig” for example will display the jail’s IP-address
Creating a mountpoint to redirect downloads to:
Creating the mountpoint after adding the plugins didn’t work out for me, at least in my previous attempt, might be fixed now. So just to be on the safe side, we’ll do this first.
Use WinSCP to create a folder – I named mine “Downloads”. I created it outside of the jail and also inside. These are the folders:
/mnt/FreeNAS/Downloads
/mnt/FreeNAS/Jail/Jail/mnt/Downloads
Plugins -> View Mount Points -> Add Mountpoint
“Source” is the Download folder outside of the Jail (in my case /mnt/FreeNAS/Downloads)
“Destination” is the mount point within the jail, since you will only be able to browse within the jail, this will be simply “/mnt/Downloads”
If you want to test this, just create a file within your Downloads folder. You should be able to see this file under “/mnt/Downloads” within the jail.
Once you have the plugins installed, make sure to configure them to put their Downloads here.
You'll have to point every plugin/program (should only be sabnzbd and transmission i guess) to this mountpoint of course.
Installing the plugins:
Yes, we are finally here ;-)
Download Joshua’s great plugins.
Install each plugin in the plugins screen (Services -> Control Services -> Plugins tab -> Install plugin).
Even though I used to install all plugins directly after another, I think it is safer to install one at a time and configure everything and then moving on to the next. I would also recommend changing writing down the ports, if you change them.
Since the GUI control doesn’t work yet, you’ll have to start the plugins from the shell.
First enter your jail: jexec 1 csh
Secondly, type: service %SERVICENAME% onestart – this would be for sabnzbd: "service sabnzbd onestart"
You’ll get a confirmation. If you want to doublecheck, run “netstat” within the jail. You should be able to see the application and on which port it is listening.
When securing the applications, pay attention when typing in the password. Somehow the devs rely on our typing skills, which is why there is no typo-preventing confirmation field ;-)
To make the plugins/programs auto-start with FreeNAS, do the following:
add '%PLUGINNAME%_enable = "YES"' to rc.conf in your jail (for me this was: /mnt/FreeNAS/Jail/Jail/etc/rc.conf) - i used WinSCP to do this.
The added lines should look like this:
sabnzbd_enable="YES"
sickbeard_enable="YES"
couchpotato_enable="YES"
headphones_enable="YES"
maraschino_enable="YES"
transmission_enable="YES"
Activating CIFS to set up a windows share
So finally for the sake of having every windows user being able to access the downloads, adding a share now…
Services -> Control Services -> CIFS Settings (wrench icon)
Choose a NetBIOS name that you fancy. This is how you will see FreeNAS in your network (e.g. \\FreeNAS\). I ticked “Large RW support” since it sounds like adding functionality, I haven’t checked what it does yet ;-)
Same goes for “Enable home directories” and “Enable home directories browsing”. As home directory I chose the “Downloads” folder (the one outside of the jail). Wonder if AIO is any good, I have no clue what it is, so I didn’t check this one (for once hehe).
Now to add the share itself:
Sharing -> Windows (CIFS) Shares -> Add Windows (CIFS) Share
Name: Again, whatever you fancy, this will be the directory you will be seeing (mine is called FreeNAS_Int, which makes my share be accessible via \\FreeNAS\FreeNAS_Int).
As path choose your “Downloads” folder. Once again I ticked “Inherit Owner”, “Inherit Permissions”, “Show Hidden Files” without really knowing what they do.
I’m using Zonealarm on one of my PCs. Make sure to add the IP of your FreeNAS to the trusted zone. This goes for every firewall I guess.
If you still cannot see or access the share, try rebooting the PC you are using to reach it and/or reboot FreeNAS. Windows likes to cache stuff, so it might still have something in the cache from before your changes.
That’s it. After doing all these steps, your FreeNAS should be set up and have all tools or downloading running.
Another note: Despite sabnzbd having a very easy to use web interface, to enhance the usability for people who don’t like working with Unix at all, set up an NZB black hole where you can store NZBs and sabnzbd starts downloading from their information right away.
Hope I didn’t forget anything… i copied the text from my word documents, so it might be messed up and i'm not sure the order is correct.
And I hope I was able to help someone. If I’ve only helped one person, the time invested was worth it

A big thanks goes out to Josh for creating these plugins. Thank you for all your time. And of course thanks to everyone else helping out, giving advice.