TrueNAS vCenter Plugin

TrueNAS Enterprise

This plugin is available to TrueNAS Enterprise customers. iXsystems Support staff are available to assist with deploying and upgrading the TrueNAS vCenter Plugin. Please contact iXsystems Support to learn more and schedule a time to deploy or upgrade the plugin.

Contacting iXsystems Support

Customers who purchase iXsystems hardware or that want additional support must have a support contract to use iXsystems Support Services. The TrueNAS Community forums provides free support for users without an iXsystems Support contract.

iXsystems Customer Support
Support Portalhttps://support.ixsystems.com
Emailsupport@ixsystems.com
Telephone and Other Resourceshttps://www.ixsystems.com/support/

vCenter Server provides a web interface to manage physical and virtual machines. The iXsystems TrueNAS vCenter Plugin activates management options for TrueNAS hardware attached to vCenter Server. This enables limited TrueNAS system management from a single interface.

The TrueNAS vCenter plugin is currently compatible with VMware vCenter Server versions 8.0, 7.0, and 6.7.0.

The vCenter plugin supports many different TrueNAS software versions installed on TrueNAS Enterprise licensed hardware:

VersionSupported
12.0Yes
13.0Yes
22.12Yes (exception)
23.10Yes (exception)
24.04Yes (exception)

Exceptions

  • TrueNAS 22.12, 23.10, and 24.04 do not support Fibre Channel for VMFS datastores.

Plugin Release Notes

TrueNAS vCenter Plugin 3.6.0

September 3, 2024

iXsystems is pleased to release TrueNAS vCenter Plugin version 3.6.0! This is a minor release to fix an issue with VMFS datastore management with TrueNAS 24.04 systems that have iSCSI ALUA enabled.

Known Issues

The TrueNAS vCenter Plugin deployment status can appear to be stuck in the vCenter activity panel. This is a cosmetic issue and the plugin deploys fully.

Previous Versions Release Notes

3.5.0 (Click to expand)

October 6, 2023

iXsystems is pleased to release TrueNAS vCenter Plugin version 3.5.0! This is a minor release designed to make the plugin compatible with vCenter 7.0 and 8.0 and minor bugfixes.

TrueNAS CORE | Enterprise 13.0 systems are compatible with the 3.5.0 plugin. CORE 12.0 deployments connected to an earlier version of this plugin should upgrade to 13.0 before attempting to connect to the 3.5.0 version of the plugin.

Changelog

Individual tickets require an iXsystems Jira login to view.

  • Plugin compatibility with vCenter 7.0 and 8.0
  • Fix plugin UI behavior when VMFS and NFS datastore types are selected
  • Plugin dependencies update
  • Offline installer fix
3.4.0 (Click to expand)

September 2, 2021

iXsystems is pleased to release version 3.4.0 of the TrueNAS vCenter plugin. The 3.4.0 plugin has numerous improvements, including:

  • Fibre Channel datastore support.
  • Development script rewritten.
  • Revamped plugin build and MANIFEST files.
  • HTTPS that was disabled in 3.3.0 due to MANIFEST errors, has been re-enabled.
  • Fixed deployment script logging.

Please note that deploying this version of the TrueNAS vCenter Plugin requires TrueNAS host systems with version 11.3 or later installed and vCenter 6.7-U3 or earlier deployed.

New Feature

  • [VCP-95] - Overhaul Deployment
  • [VCP-117] - Add Fibre Channel datastore support

Improvement

  • [VCP-115] - Refocus snapshot and snapshot task creation for TrueCommand

Bug

  • [VCP-114] - Deployment logging is not functional
  • [VCP-116] - vCenter Plugin Install
  • [VCP-125] - The error message should say "You don't have sufficient privilege to Create Datastore "
  • [VCP-127] - Cloning Fibre Channel datastores or parallel HBAs fails on target creation
  • [VCP-128] - Support log file Error states that it is an unsupported protocol scheme
  • [VCP-129] - Remove the text about vCenter removing datastores from the TrueNAS
  • [VCP-130] - Cloning a VMFS datastore created it on the TN but not on vCenter

Known Issues

KeySummaryWorkaround
VCP-135FC datastore rollback fails.VMFS rollback fails. Users will have to continue rollback themselves, disabling FC port and then deleting the target, since this release doesn’t disable the FC port first, which causes an exception. See related ticket NAS-111676.
VCP-89vCenter 7.0b has issues rendering the plugin interface.This is scheduled to be resolved in a future plugin update, but it is recommended for customers to continue using vCenter 6.7-U3 or earlier with this plugin.
The plugin replication feature has been removed due to numerous long-standing issues that could not be resolved for this version of the plugin.Please continue to create replication tasks using the TrueNAS web interface.
VCP-113Cloned datastores always use the first listed interface.To work around this issue, either ensure the original datastore is using the desired interface or create a new datastore instead of making a clone.
3.3.0 (Click to expand)

November 24, 2020

iXsystems is pleased to release version 3.3.0 of the TrueNAS vCenter plugin! This is a maintenance release of the plugin, designed to improve functionality and add support for TrueNAS 12.0 host systems. As part of this maintenance release, additional testing resources have been devoted to the plugin and several large-scale improvements have also been identified for future plugin versions.

Improvement

  • VCP-78 - Convert to TrueNAS API 2.0 for improved compatibility and reliability with TrueNAS 11.3 and 12.0

Bug

  • VCP-84 - vCenter plugin does not function with TrueNAS 11.3 unless the legacy API 1.0 endpoint is enabled

Known Issues

  • vCenter 7.0b has issues rendering the plugin interface (VCP-89). This is scheduled to be resolved in a future plugin update, but it is recommended for customers to continue using vCenter 6.7-U3 or earlier with this plugin.
  • https has been disabled for the 3.3.0 release (VCP-105) due to an issue with connector initialization failures and conflicts with the Apache HTTPClient dependency. TrueNAS users must enable http on their TrueNAS system for the 3.3.0 plugin to connect properly! To verify TrueNAS 11.3 or 12.0 can connect, log in to the web interface, go to System > General, and make sure Web Interface HTTP > HTTPS Redirect* is unset. This issue is scheduled for resolution in plugin version 4.0.
  • The plugin replication feature has been removed due to numerous long-standing issues that could not be resolved for this version of the plugin. Continue to create replication tasks using the TrueNAS web interface.
  • Cloned datastores always use the first listed interface (VCP-113). To work around this issue, either ensure the original datastore is using the desired interface or create a new datastore instead of making a clone.
  • Plugin deployment complains about logging system error (VCP-114). This is a cosmetic error based on initial plugin deployments creating an empty log file. There is no impact to installing or using the vCenter Plugin.
3.2.0 (Click to expand)

March 24, 2020

iXsystems is pleased to release version 3.2.0 of the TrueNAS vCenter plugin! This is the newest release of the plugin, designed to allow managing TrueNAS systems from within VMware vCenter. The 3.2.0 plugin has numerous improvements, like iSCSI fixes, communication support, and new vCenter 7.0 support. Here are a few other highlights of this release:

  • Initial support for vCenter 7.0 [ NAS-102950 ]
  • Added support for secure communication with TrueNAS (HTTPS) [ NAS-103636 ]
  • Refresh asynchronously when adding a new datastore [ NAS-100183 ]
  • iSCSI configuration bug fixes [ NAS-103853 ]

For a detailed list of all vCenter plugin 3.2.0 changes, please see the completed vCenter plugin 3.2.0 Jira tickets.

3.1.0 (Click to expand)

July 16, 2019

iXsystems is pleased to announce the availability of vCenter 3.1.0, a standalone plugin for managing TrueNAS systems within VMware vSphere.

New Features

  • [NAS-100574] – Use standalone application for automatic deployment of vCenter plugin
  • [NAS-100839] – Add VMFS6 support

Improvements

  • [NAS-100070] – Provide an indication when user times out for inactivity
  • [NAS-100075] – Add ability to remove user and role from RBAC
  • [NAS-101357] – Remove duplicate Configure and Update tabs
  • [NAS-101600] – Add ability to select cluster for VMFS datastore
  • [NAS-102360] – Store deployment and support logs in log folder

Bug Fixes

  • [NAS-101355] – Fix issue that prevented re-adding a removed host
  • [NAS-101356] – Remove spurious Other Action from Actions menu
  • [NAS-101358] – Ensure network interfaces retrieve a bind IP to be used to create Portal
  • [NAS-101359] – Display High Availability status
  • [NAS-101791] – Update output text from installer
  • [NAS-101840] – Improve uninstall and upgrade handling
  • [NAS-101846] – Fix issue when mounting NFS share in a cluster
  • [NAS-102312] – Fix issue when creating a VMFS datastore in TrueNAS 11.2-U5
  • [NAS-102324] – Fix problem with stalls when cloning datastore
  • [NAS-102365] – Fix problems related to removing roles, users, and permissions
  • [NAS-102388] – Indicate that the user needs to use the stop then start commands to restart vCenter 6.5
  • [NAS-102429] – Ensure text box for Hostname is read-only
  • [NAS-102455] – Warn user in documentation of maximum supported volumes limit

Using the Plugin

After being assisted with plugin deployment, using the plugin involves connecting TrueNAS hosts and configuring the various features to your use case. The interface suspends after several minutes of inactivity and displays a warning that the interface is suspended and must be refreshed.

Connecting TrueNAS Hosts

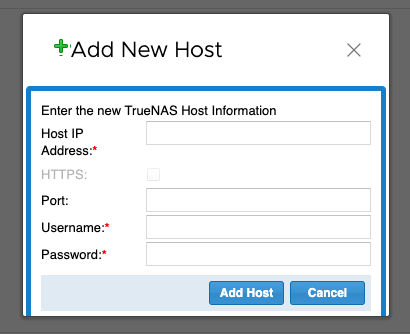
In a browser, go to your vCenter Server web interface, log in, and click Menu > Global Inventory Lists > Manage TrueNAS > + Add host to add TrueNAS hosts to vCenter.
AddHost

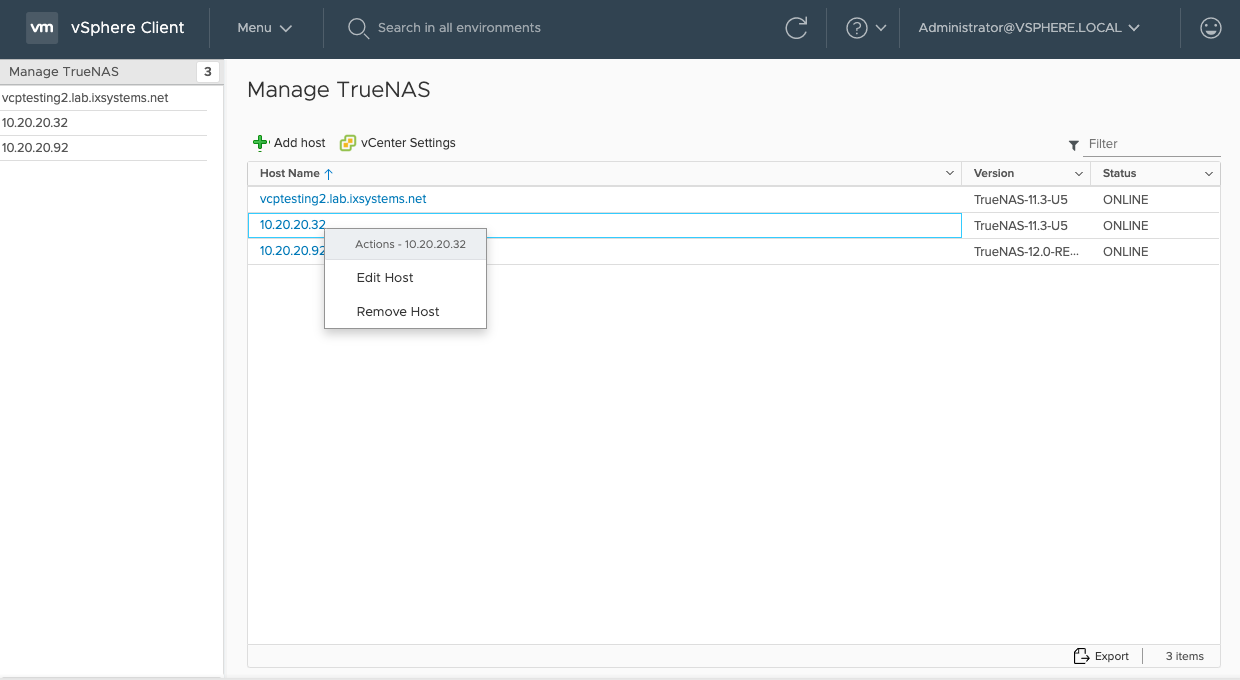
Fill in the required information. A hostname or IP address can be used for the TrueNAS system. For High Availability systems, use the VIP address or hostname to ensure the plugin remains connected in the event of a system failover. Click Add Host and the TrueNAS hostname or IP address appears in the list of connected systems.
HostList

Right-click a list entry to see options to edit the host user credentials or remove that host from vCenter. Click a hostname to see the system management options. Clicking a system entry opens the management interface.

System Management

The system management screen shows a summary and options to modify the system.

To modify the TrueNAS system, click Configure. Each submenu has a row of buttons to add or make changes to any items in the list. vCenter works in the background when resolving change requests. Refresh updates the list to see any items that might have finished being created or modified. Tasks in progress display in the collapsible Recent Tasks area across the bottom of the screen. Naming objects in the plugin follow a standard convention. Names can contain spaces, alphanumeric, -, and . characters.

Click Summary to view basic information about this system. The IP address, installed version of TrueNAS, storage availability, and system service status are shown.
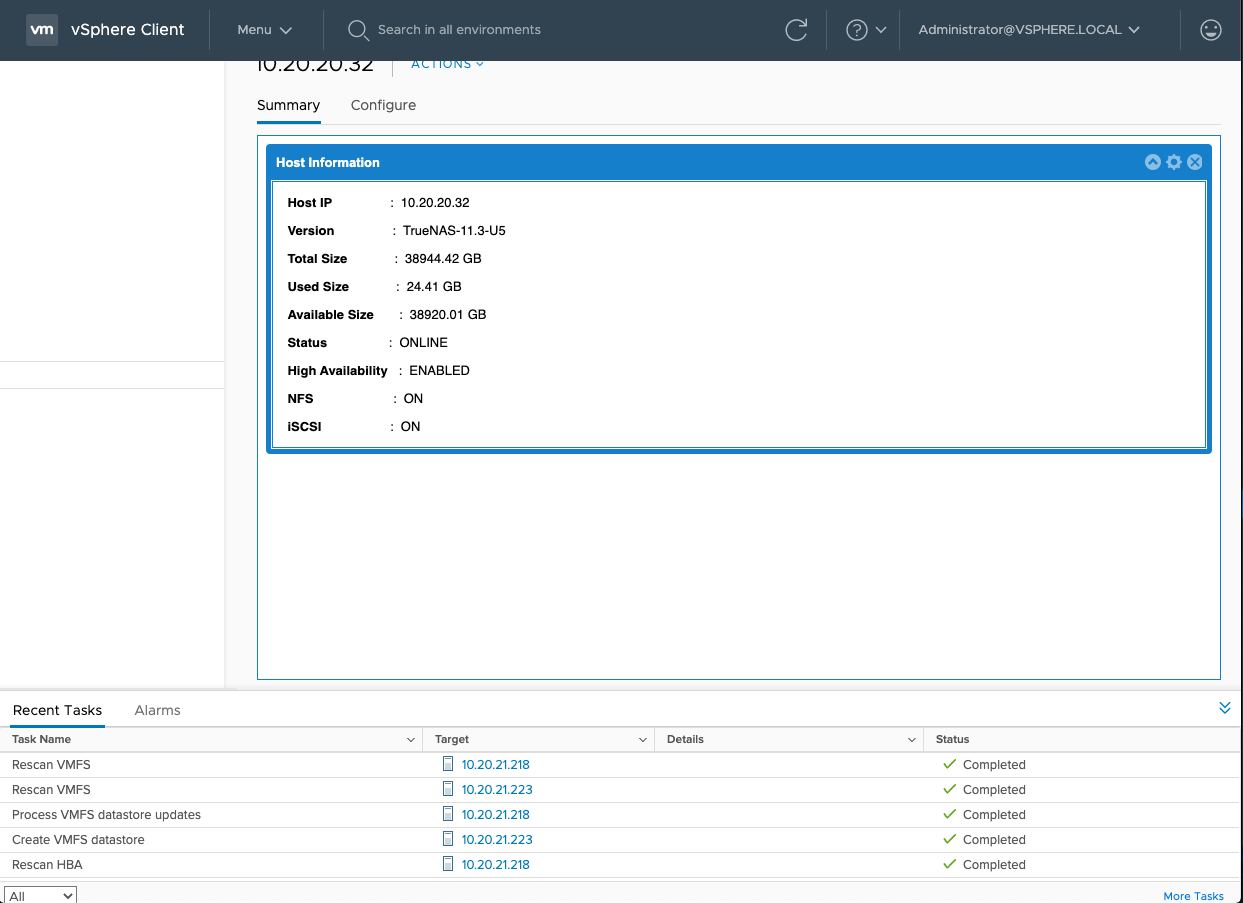
HostSummary

The vCenter plugin can create two different kinds of datastores on a TrueNAS host:

  • Virtual Machine File System (VMFS) for iSCSI block-level access
  • Network File System (NFS) for file-level access

List

DatastoreList

vCenter has a default limit of eight NFS datastores per ESX host. See this VMware article about maximum supported volumes for more details.

The list shows Datastores that have been created and are managed by the plugin. The list does not display other types of shares created and managed through the TrueNAS web interface.

Add Datastore

Click + (Add) to create a new datastore.
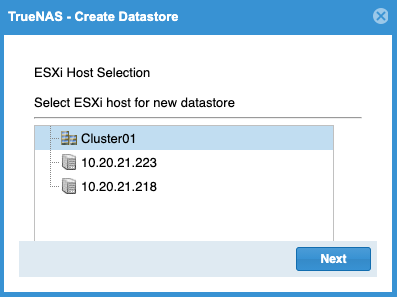
DatastoreCreate

Choose an ESXi host for the datastore or an ESXi cluster to spread the reserved space across multiple systems. Clusters can be used as long as a single member of the cluster supports the datastore features. Click Next.
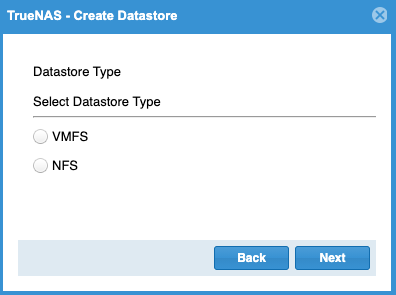
DatastoreCreateType

Choose the datastore type. VMFS datastores provide block-level (iSCSI) storage for virtual machines. NFS datastores provide file-level storage access. Click Next to view specific options for each datastore type

VMFS Datastore Configuration

VMFSDatastoreSettings

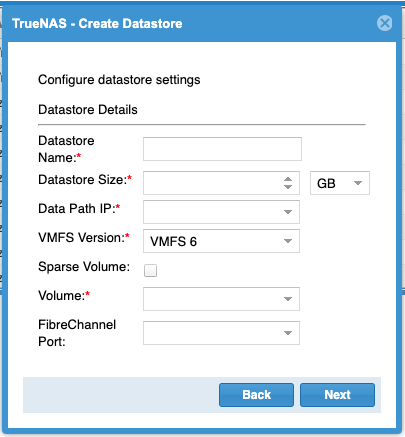
Enter a name for the new datastore. Enter a value and choose a unit for the Datastore Size. The size must be smaller than the chosen Volume. The minimum size for a VMFS datastore is 2GB.

The Data Path IP shows the TrueNAS system IP address. Users can select other connected TrueNAS systems with the dropdown list.

Select the datastore from the VMFS Version dropdown list. Choose between the modern version 6 or the legacy versions 3 and 5. See the VMware VMFS documentation for detailed comparisons.

Enabling Sparse Volume reserves less than the total available size and metadata storage space, but it can cause writing to fail if the volume has little space remaining. See zfs(8) for more details.

Select the TrueNAS pool to hold the datastore. The volume must be large enough to contain the chosen datastore size.

If you have a high availability NAS with a Fibre Channel license and a network configured to form a Fibre Channel fabric with the NAS and ESXi, you are also able to select a Fibre Channel port for the datastore.

Selecting a Fibre Channel port enables that port with the datastore target on the NAS and creates a datastore with a corresponding Fibre Channel HBA on the ESXi. One target per port is supported.

NFS Datastore Configuration

NFSDataStoreSettings

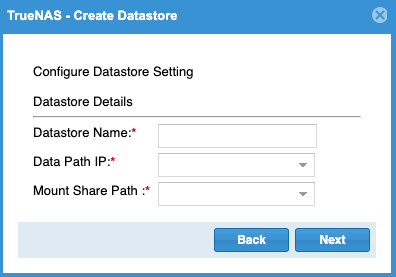
Enter a name for the new datastore. The Data Path IP shows the TrueNAS system IP address. Users can select other TrueNAS systems added to vCenter Server with the dropdown list. Select the path to the TrueNAS NFS share from the Mount Share Path dropdown list. Click Next.

Review Datastore Configuration

After configuring the VMFS or NFS datastore, vCenter shows a summary of the new datastore. To begin creating the datastore, review the settings and click Finish. The interface shows a warning when the datastore contains more than 80% of the available space. Click Refresh to see the new datastore after creating it.

Extending a Datastore

Users needing additional space can increase the total size of a VMFS datastore. Highlight a VMFS datastore from the list and click Edit to extend it.
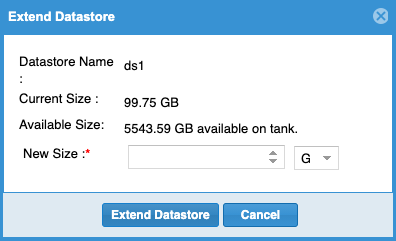
DatastoreExtend

The new size must be larger than the current size and less than the total available capacity. For best performance, we recommend using less than 80% of the total available size. Using decimal notation rounds down the size to the nearest 1024 bytes (or whatever the configured default block size for the volume is). Click Extend Datastore. Datastores reserve some available space for internal use and set the available capacity to slightly less than the chosen amount.

Cloning Datastores

Cloning an NFS or VMFS datastore duplicates that datastore. Select a datastore from the list and click Clone. Choose an ESXi host to store the new datastore and click Next. Enter a name for the clone and click Clone Datastore.

vCenter starts the cloning process and continues the task in the background. Click Refresh after some time to see the cloned datastore.

An administrator can grant vCenter users specific role-based access to the TrueNAS systems managed by this plugin. New vCenter users must be created in Menu > Administration > Single Sign On > Users and Groups before RBAC roles can be created.
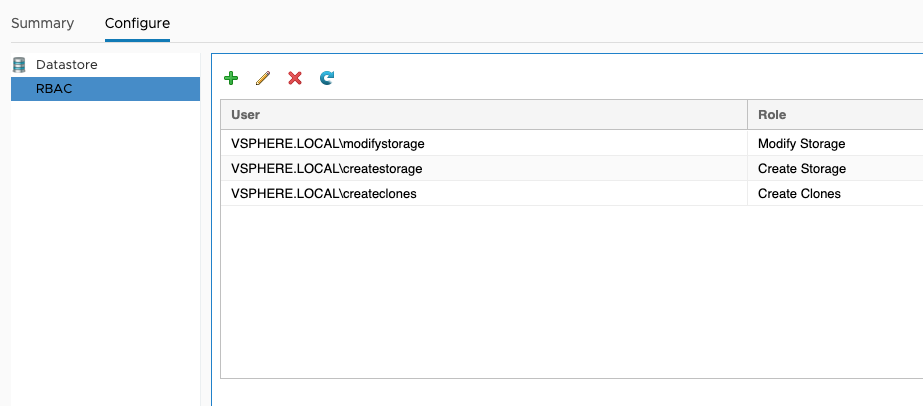
RBACRoles

Role NameUser is allowed to:
DiscoveryAdd TrueNAS systems to vCenter
Create ClonesCopy existing datastores
Create StorageCreate new datastores
Modify StorageEdit existing datastores
Destroy StorageDelete datastores

Each role gives the user the ability to perform the functions in that role and all of the roles that precede it in the list. For example, a user with a Create Storage role can create a new datastore and clone existing datastores. The vCenter administrator account always has all permissions.

Add a Role to an Existing vCenter User

Click + to open the Add Role Based Access Control window. Type a user name in the form DOMAIN.NAME\username, where DOMAIN.NAME is the user domain found in the vCenter Menu > Administration > Single Sign On > Users and Groups page. Open the Assign Role dropdown list and choose a role for the user. Click Add to add the role.

If the entry does not appear in the list immediately, click Refresh.