




TrueNAS Development Documentation
This content follows experimental development changes in TrueNAS 28, a future version of TrueNAS.
Use the Product and Version selectors above to view content specific to a stable software release.
Multiprotocol Shares
9 minute read.
A multiprotocol share exposes the same dataset over both SMB and NFS simultaneously, so Windows clients and Unix-like systems can access the same data without duplicating storage. This is most useful in mixed environments where some clients lack an SMB client or where a Linux workload and Windows clients need shared access to the same files.
For many environments, a single-protocol SMB share is simpler to administer and delivers better performance. Linux clients can access SMB shares using mount.cifs.
Consider multiprotocol sharing when your environment genuinely requires concurrent access from both protocol types.
To protect data integrity, NFS clients must preserve extended attributes when copying files; otherwise, the copy can discard SMB metadata. We recommend NFSv4 with Active Directory and Kerberos authentication for the NFS side of the share, as NFS defaults provide limited access control. This is especially important for Enterprise environments.
TrueNAS enables SMB3 unix extensions for multiprotocol shares, allowing Linux clients with SMB3 POSIX support to use filesystem primitives beyond standard SMB semantics. Windows clients without unix extension support are unaffected.
When accessing files through a web file share (WebShare) and an SMB share, you must configure the SMB share with the Multi-Protocol share Purpose preset. This configuration coordinates file access between the different protocols. It reduces, but does not eliminate, the risk of file conflicts. This configuration results in the SMB share experiencing a performance impact (slower response).
Note, even with this preset configuration, avoid simultaneous access to the same files from both protocols, since that can cause data corruption.
TrueNAS provides two methods for adding a multiprotocol share. Which you choose depends on whether the dataset already exists.
If you are setting up multiprotocol sharing for the first time and do not yet have a dataset, use the Add Dataset method. TrueNAS creates the dataset, the SMB share, and the NFS share together in a single step. This is the recommended approach for new setups.
If you already have a dataset or NFS share and want to add Windows SMB access to it, use the Add SMB method. This configures the SMB share with the settings required for safe multiprotocol interoperability, including for paths accessed by local processes, containers, or FTP. If the dataset does not yet have an NFS share, you need to create one separately after adding the SMB share.
Before adding a multiprotocol share, start the SMB and NFS services. From the Shares screen, click on the Windows (SMB) Shares or Unix (NFS) Shares widget and select Turn On Service. From the System > Services screen, click Start Service for the SMB or NFS service. Toggle Start Automatically on to start the service when TrueNAS boots.
To configure service settings, click on the widget and select Config Service, or go to System > Services and click edit Edit for the service.

Unless you need a specific setting or are configuring a unique network environment, we recommend using the default SMB service settings. After adding a share, use the share toggle on the widget to enable or disable that individual share.
Open the NFS service settings using Config Service from the menu on the Unix (NFS) Shares widget. Alternatively, go to System > Services and click edit Edit for NFS. Select only NFSv4 on the Enabled Protocols dropdown list. For security hardening, we recommend disabling the NFSv3 protocol. Select Require Kerberos for NFSv4 if you are using Active Directory.
Click Save, then start the NFS service.
TrueNAS automatically generates and applies the Kerberos service principal name (SPN) for the NFS service when the system joins Active Directory or FreeIPA. No manual SPN configuration is required.
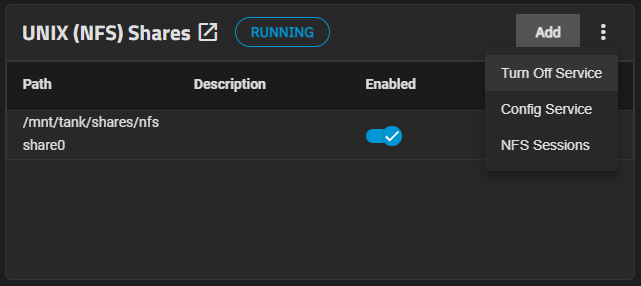
Each NFS share also has a toggle to enable or disable that individual share.
The NFS service does not automatically start on boot if all NFS shares remain encrypted and locked.
NFS shares do not respect permissions set in the SMB share ACL. Protect the NFS export with proper authentication and authorization controls to prevent unauthorized access by NFS clients.
If you are not using Active Directory, NFS access controls rely on client-reported UIDs rather than verified credentials. NFS without Kerberos has no robust per-user authentication, making it an inherently less secure configuration.
For Enterprise environments, we recommend joining TrueNAS to an Active Directory domain before creating the share. Configure a container (group or organizational unit), Kerberos admin, and user accounts in AD. This enables verified per-user authentication for NFS clients and is the most secure configuration for multiprotocol access.
When creating a share, do not attempt to set up the root or pool-level dataset for the share. Instead, create a new dataset under the pool-level dataset for the share. Setting up a share using the root dataset leads to storage configuration issues.
TrueNAS allows you to create the dataset and add a multiprotocol (SMB and NFS) share using the Add Dataset screen. This is the recommended method when creating a multiprotocol share for the first time.
Select the parent dataset where you want to add the multiprotocol dataset, then click Add Dataset.
Enter a name for the dataset.
Select Multiprotocol from the Dataset Preset dropdown. The share configuration options display with Create NFS Share and Create SMB Share preselected. The dataset name populates the SMB Name field and becomes the name of the SMB and NFS shares.
(Optional) Click Advanced Options to customize other dataset settings such as quotas, compression level, encryption, and case sensitivity. See Creating Datasets for more information on adding and customizing datasets.
Click Save. TrueNAS creates the dataset and the SMB and NFS shares.
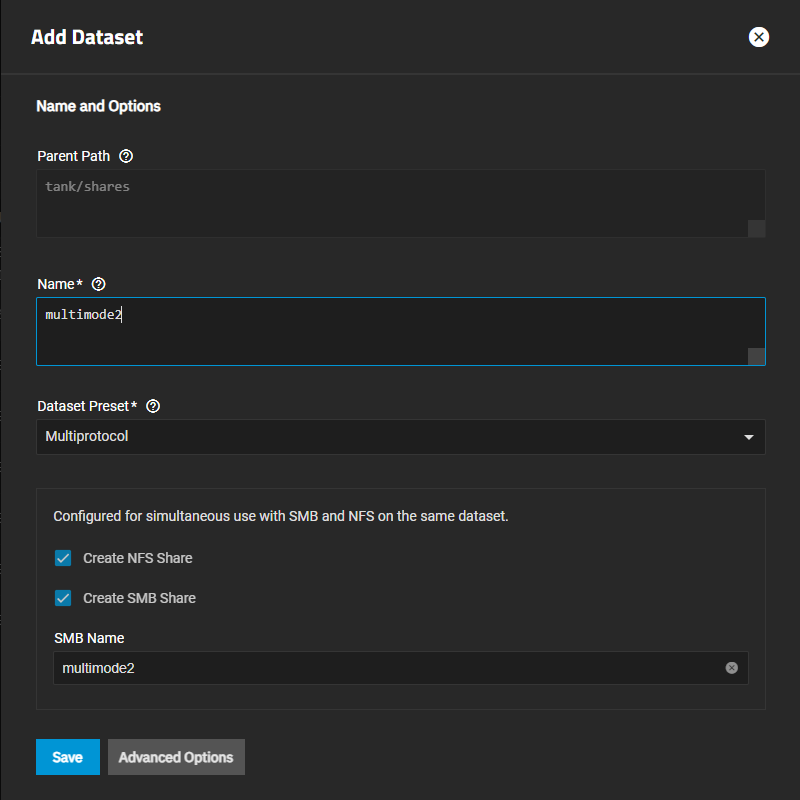
TrueNAS applies the same settings as the Multi-Protocol Share option in Purpose on the Advanced Options for the Add SMB screen. To modify share settings after saving, go to Shares, click on the share, select Edit, and click Advanced Options.
After adding the dataset, edit the dataset ACL to configure permissions.
If you have an existing dataset or NFS share and want to add Windows SMB access, use this method. Adding a multiprotocol share from the Add SMB screen configures the SMB share with the correct settings for multiprotocol interoperability. These settings also apply to paths accessed by local processes, containers, or FTP. If the dataset does not yet have an NFS share, complete steps 6–8 below to create one after saving the SMB share.
To create the share and dataset, go to Shares and click Add on the Windows (SMB) Shares widget. The Add SMB screen opens.
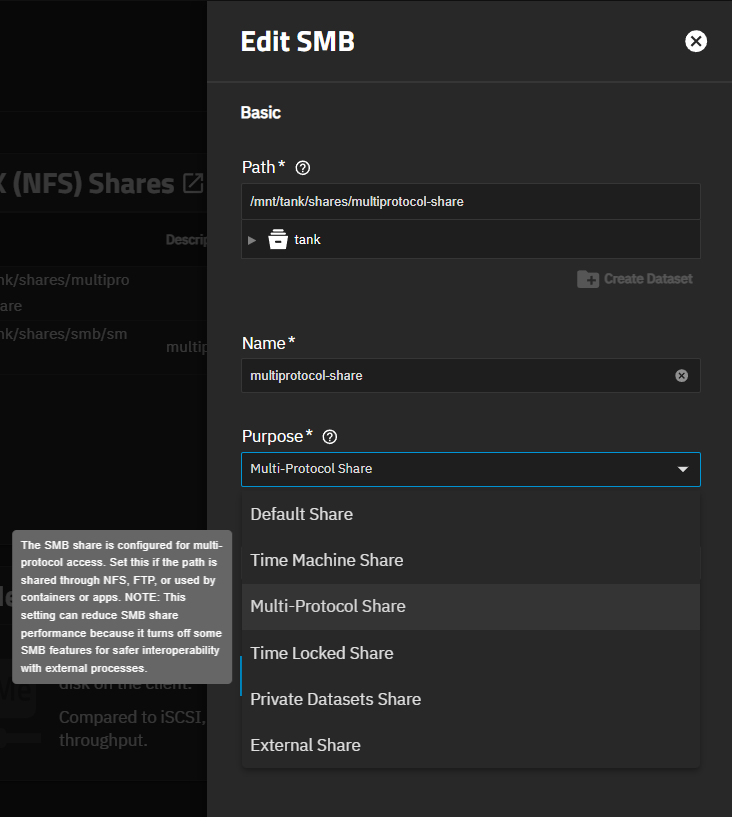
Enter or browse to select the parent dataset where you want to add the share dataset, then click Create Dataset. Enter a name for the dataset/share, then click Create Dataset. The Path field populates with the path to the dataset, and the Name field populates with the dataset/share name. Both the dataset and the share have the same name.
Select Multi-Protocol Shares on the Purpose dropdown list. This applies the pre-determined Other Options selected on the Advanced Options screen.
Click Advanced Options to modify any settings you want to use.
(Optional) Enter a Description to help explain the share purpose.
Click Save. TrueNAS prompts you to restart the SMB service. Click Restart SMB Service to apply the new share configuration immediately, or dismiss the prompt to apply changes later. Restarting causes a brief interruption for all connected SMB clients.
Configure the ACL when prompted.
If the dataset already has an NFS share, the multiprotocol share is now configured. Skip to Completing the Share Configuration.
If the dataset does not yet have an NFS share, continue with steps 6–8.
Click Add on the UNIX (NFS) Shares widget to open the Add NFS screen.
Set the path to the same dataset created for the SMB share.
Customize the NFS share to suit your use case, and click Save.
After creating the multiprotocol share using either method, complete the following steps.
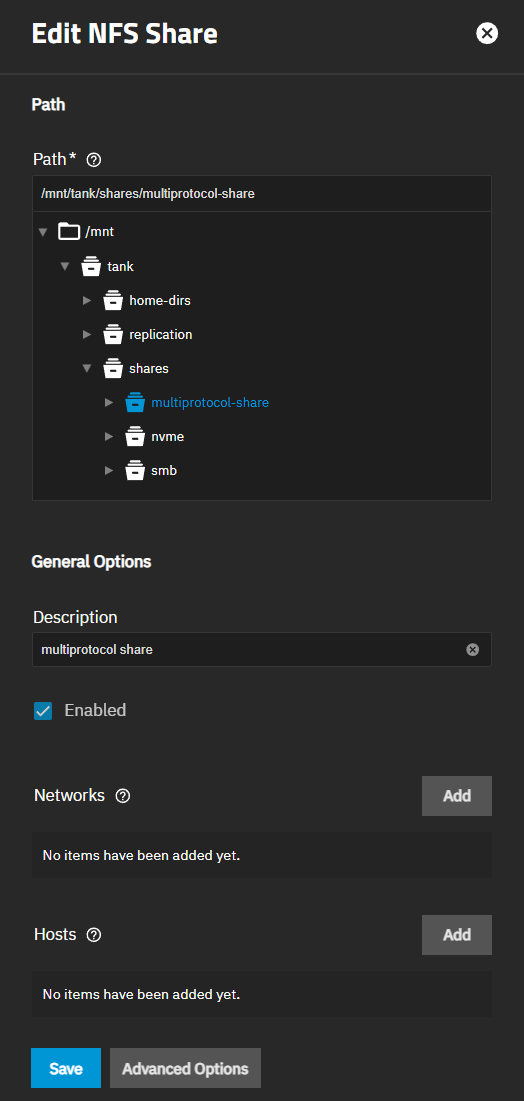
Go to Shares and edit the NFS share to configure additional settings.
Select the new share listed on Unix (NFS) Shares widget, click on the icon and then click Edit. The Edit NFS screen opens with the Basic Options settings showing.
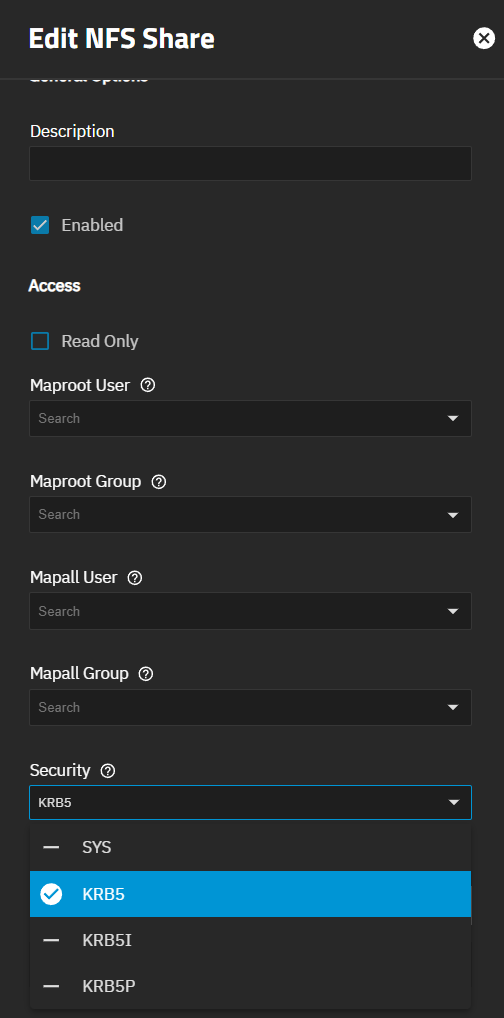
If you are using Active Directory, we recommend enabling Kerberos security. Click Advanced Options and select KRB5 from the Security dropdown. This applies the Kerberos ticket generated when you joined Active Directory.
(Optional) Select Read-Only to prevent clients from writing to the share. Use this to expose the share as a read-only data source, for example when multiple teams need access to the same files but only one should be able to modify them.
Click Save.
Use the Edit ACL screen to verify that users and groups who need access to the share have the correct permissions.
To open the ACL editor from the Shares screen, select the share row on the Windows (SMB) Shares widget and click Edit Filesystem ACL.
Editing the dataset ACL sets permissions for both the SMB and NFS shares.

Alternatively, go to Datasets, select the dataset row created for the multiprotocol share on the Datasets table, then scroll down to the Permissions widget for the dataset. Click Edit to open the Edit ACL screen.

Review the Access Control List to verify the required users or groups are present with the correct permissions. If not, add an Access Control Entry (ACE).
Select User or Group from the Who dropdown. If using Active Directory, select Group and enter your AD group.
Enter or select the user or group name in the field below.
Set the appropriate level in the Permissions dropdown. Select Full Control to grant full read and write access.
Click Save Access Control List to apply the changes.
See Permissions for more information on editing dataset permissions.
After setting the dataset permission, connect to the share.
After creating and configuring the shares, connect to the multiprotocol share using either SMB or NFS. Supported clients include Windows, Apple, FreeBSD, and Linux/Unix systems.
For more information on accessing shares, see Mounting the SMB Share and Connecting to the NFS Share.