TrueNAS Apps: UI ReferenceTrueNAS Apps: UI Reference
Application maintenance is independent from TrueNAS version release cycles.
App versions, features, options, and installation behavior at time of access might vary from documented tutorials and UI reference.

Custom App Screens

Custom App on the Discover screen opens the Install iX App guided installation wizard. > Install via YAML opens the Add Custom App screen with an advanced YAML editor for deploying apps using Docker Compose.

Install iX App Screen

The Install iX App screen allows you to configure third-party applications using Docker settings. Use the wizard to configure applications not included in the official catalog.

Install iX App Screen
Figure 1: Install iX App Screen

The panel on the right of the screen links to each setting area. Click on a heading or setting to jump to that area of the screen. Click in the Search Input Fields to see a list of setting links.

Install Custom App Toc
Figure 2: Install Custom App ToC

Settings are grouped into Application Name, Image Configuration, Container Configuration, Security Context Configuration, Network Configuration, Portal Configuration, Storage Configuration, and Resources Configuration sections.

Application Name Settings

Application Name has two required settings, Application Name and version. After completing the installation these settings are not editable.

Application Name Settings
Figure 3: Application Name Settings
Settings Information
SettingDescription
Application NameEnter a name for the application. The name must have lowercase alphanumeric characters, begin with an alphabet character, and can end with an alphanumeric character. The name can contain a hyphen (-) but not as the first or last character in the name. For example, use chia-1 but not -chia1 or 1chia- as a valid name.
VersionDisplays the current version of iX-App. Accept the default number.

Image Configuration Settings

Image Configuration settings specify the container image details. They define the image, tag, and when TrueNAS pulls the image from the remote repository.

Image Configuration Settings
Figure 4: Image Configuration Settings
Settings Information
SettingDescription
Repository(Required) Enter the Docker image repository name. For example, plexinc/pms-docker for Plex.
TagEnter the tag to use for the specified image. For example, public for Plex. Or accept the default latest.
Pull PolicySelect the Docker image pull policy from the dropdown list. Options are Only pull image if not present on host (default option), Always pull image even if present on host, and Never pull image even if it’s not present on host.

Container Configuration Settings

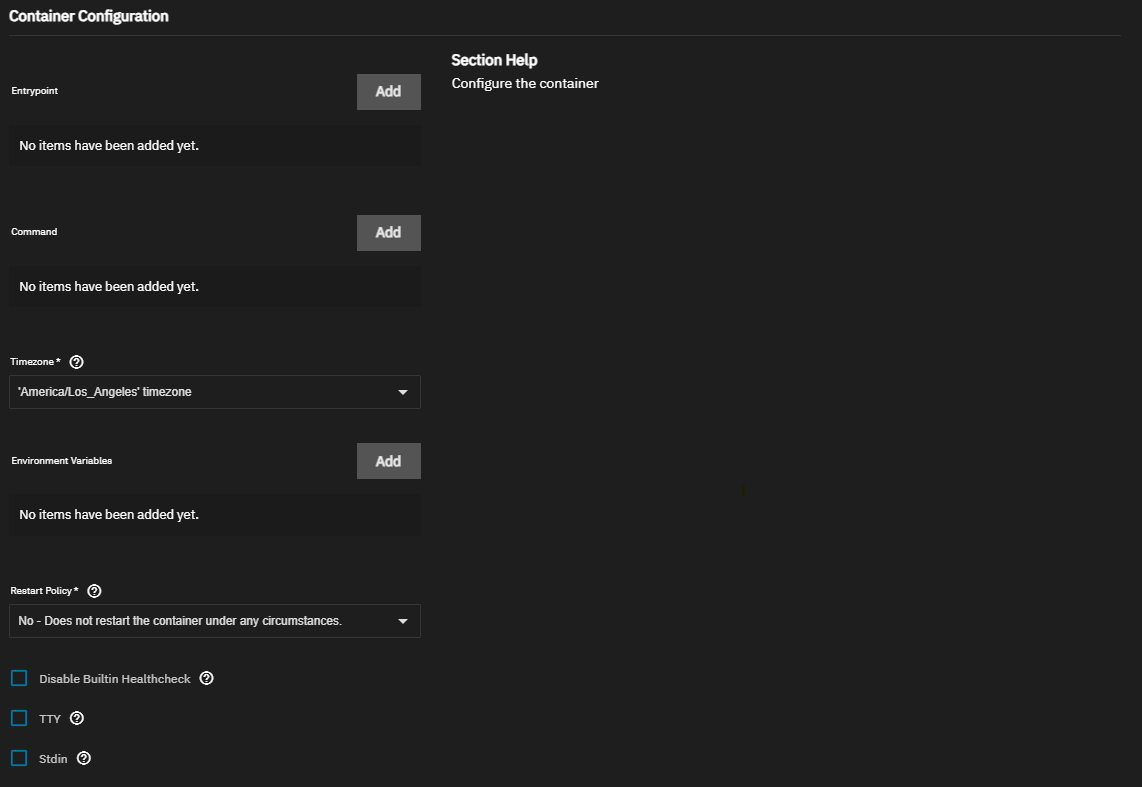
Container Configuration settings specify the entrypoint, commands, timezone, environment variables, and restart policy to use for the image. These can override any existing variables stored in the image. Check the documentation for the application you want to install for required entrypoints, commands, or variables.

Container Configuration Settings
Figure 5: Container Configuration Settings
Settings Information
SettingDescription
EntrypointClick Add to display a new field. Each field is an item in the ENTRYPOINT list in exec format. For example, to enter ENTRYPOINT ["top", "-b"], enter top in the first Entrypoint field. Click Add again. Enter -b in the second field.
CommandClick Add to display a new field. Each field is an item in the CMD list in exec format. For example, to enter CMD ["echo", "hello world"], enter echo in the first Command field. Click Add again. Enter hello world in the second field.
TimezoneUse the dropdown to select a timezone setting for the container or begin typing the timezone to see a narrowed list of options to select from.
Environment VariablesClick Add to display a block of environment variables. Click Add again to enter another set of environment variables.
NameEnter the environment variable name or key. For example, enter MY_NAME.
ValueEnter the value for the variable specified in Environment Variable Name. For example, enter John Doe, John\ Doe, or John.
Restart PolicyUse the dropdown to select a restart policy to use for the container. Options are No - Does not restart the container under any circumstances., Unless Stopped - Restarts the container irrespective of the exit code but stops restarting when the service is stopped or removed., On Failure - Restarts the container if the exit code indicates an error., and Always - Restarts the container until its removal..
Disable Builtin HealthcheckSelect to disable the built-in HEALTHCHECK defined in the image, for example to address performance or compatibility requirements.
TTYSelect to enable a pseudo-TTY (or pseudo-terminal) for the container.
StdinSelect to keep the standard input (stdin) stream for the container open, for example for an interactive application that needs to remain ready to accept input.

Security Context Configuration Settings

Security Context Configuration settings allow you to run the container in privileged mode, grant the container Linux kernel capabilities, or define a user to run the container.

Security Context Configuration Settings
Figure 6: Security Context Configuration Settings
Settings Information
SettingDescription
PrivilegedSelect to run the container in privileged mode.
By default, a container cannot access any devices on the host. With Privileged enabled, the container has access to all devices on the host, which allows the container nearly all the same access as processes running on the host. Be cautious if enabling privileged mode. A more secure solution is to use Capabilities to grant limited access to system processes as needed.
CapabilitiesClick Add to display a container capability field. Enter a Linux capability to enable, for example, enter CHOWN. Click Add again to enter another capability.
Custom UserSelect to display the User ID and Group ID fields.
User IDDisplays when Custom User is selected. Enter the numeric UID of the user that runs the container. Defaults to 568 (apps).
Group IDDisplays when Custom User is selected. Enter the numeric GID of the group that runs the container. Defaults to 568 (apps).

Network Configuration Settings

Network Configuration settings specify network, ports, and DNS servers if the container needs a custom networking configuration.

See the Docker documentation for more details on host networking.

Use port forwarding to reroute container ports that default to the same port number used by another system service or container. See Default Ports for a list of assigned ports in TrueNAS. See the Docker Container Discovery documentation for more on overlaying ports.

By default, containers use the DNS settings from the host system. You can change the DNS policy and define separate nameservers and search domains. See the Docker DNS services documentation for more details.

Network Configuration Settings
Figure 7: Network Configuration Settings
Settings Information
SettingDescription
Host NetworkSelect to bind the container to the TrueNAS host network. When bound to the host network, the container does not have a unique IP-address, so port-mapping is disabled.
PortsClick Add to display a block of port configuration fields to specify the port values and transfer protocol. Click again to add additional port mappings.
Container PortEnter a port number in the container. Refer to the application documentation for default port values.
Host PortEnter an open port number on the TrueNAS host.
ProtocolSelect the protocol from the dropdown list. Options are TCP or UDP.
NameserversUse to add one or more IP addresses to use as DNS servers for the container. Click Add to the right of Nameservers to display a Nameserver entry field. Click again to add another name server.
NameserverEnter the IP address of the name server.
Search DomainsUse to add one or more DNS domains to search non-fully qualified host names. Click Add to display a Search Domain field to enter the domain you want to configure. Click again to add another search domain. See the Linux search documentation for more information.
Search DomainEnter the search domain you want to configure. For example, mydomain.com.
DNS OptionsUse to add one or more key-value pairs to control various aspects of query behavior and DNS resolution. Click Add to display an Option field. Click again to add another option. See the Linux options documentation for more information.
OptionEnter a key-value pair representing a DNS option and its value. For example, ndots:2.

Portal Configuration Settings

The Portal Configuration settings configure the web UI portal for the container.

Click Add to display the web portal configuration settings.

Portal Configuration Settings
Figure 8: Portal Configuration Settings
Settings Information
SettingDescription
NameEnter a UI portal name to use and display in the UI. For example, MyAppPortal.
ProtocolSelect the web protocol to use for the portal from the dropdown list. Options are HTTP or HTTPS.
Use Node IPSelect to use the TrueNAS node, or host, IP address to access the portal. Selected by default.
HostDisplays when Use Node IP is not selected. Enter a host name or an internal IP within your local network, for example my-app-service.local or an internal IP address.
PortEnter the port number to use for portal access. The port number the app uses should be in the documentation provided by the application provider/developer. Check the port number against the list of Default Ports to make sure TrueNAS is not using it for some other purpose.
PathEnter the path for portal access, for example /admin. Defaults to /. The path is appended to the host IP and port, as in truenas.local:15000/admin.

Storage Configuration Settings

The Storage Configuration settings specify persistent storage paths and share data claims separate from the lifecycle of the container. For more details, see the Docker storage documentation.

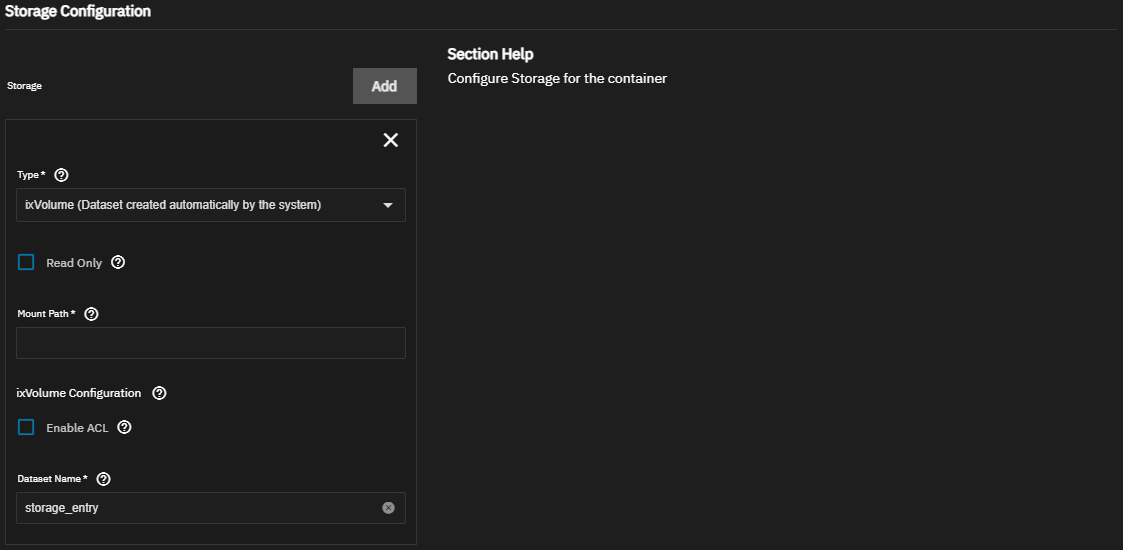
You can mount TrueNAS storage locations inside the container with host path volumes. Create the storage volumes in TrueNAS and set the host path volume to a dataset and directory path. Define the path to the system storage and the container internal path for the system storage location to appear. Alternatively, select ixVolume to allow TrueNAS to create a dataset on the apps storage pool. Both Host Path and ixVolume attach container storage as a bind mount. See Docker Bind Mount documentation for more information.

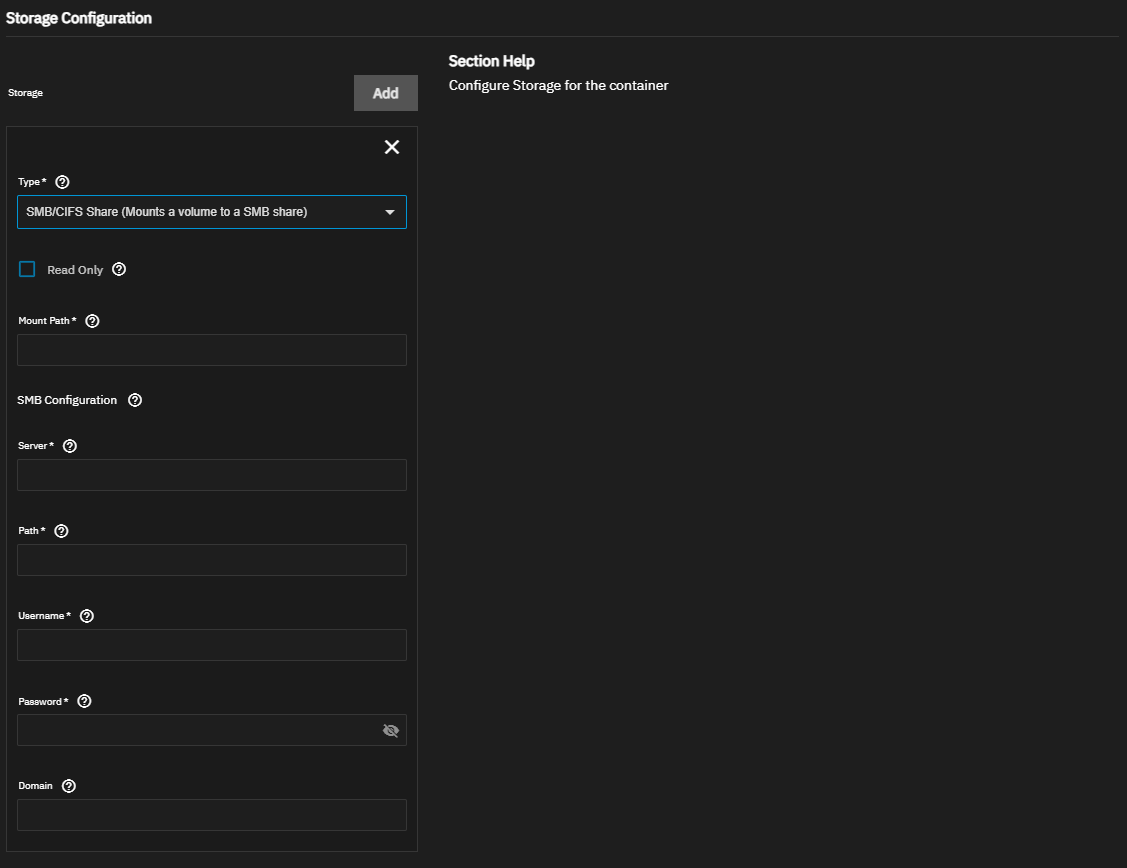
Users can create additional SMB share volume claims within the container to access an SMB share. Share volumes consume space from the pool chosen for application management.

Finally, Tmpfs allows the container to utilize a temporary directory on the RAM. See the Docker tmpfs documentation for more information.

Storage Configuration Settings
Figure 9: Storage Configuration Settings
Settings Information

Click Add to display a block of storage configuration settings. Click again to mount an additional storage volume.

Select an option from the Type dropdown:

Host Path (Path that already exists on the system)

Use to configure a persistent host path.

SettingDescription
Read OnlySelect to make the mount path inside the container read-only and prevent the app from using the path to store data.
Mount Path(Required) Enter the path/to/directory where the host path mounts inside the container.
Enable ACLSelect to enable custom Access Control List (ACL) entries for the container mount and display ACL settings fields.
Host Path(Required) Enter a path or click arrow_right to the left of /mnt to browse to the location of the dataset to populate the Host Path. Click on the dataset to select and display it in the Host Path field.
ACL EntriesDisplays when Enable ACL is selected.
Click Add to display a block of ACL entry settings.
ID TypeDisplays when Enable ACL is selected and Add is clicked.
Select Entry is for a USER or Entry is for a GROUP.
IDDisplays when Enable ACL is selected and Add is clicked.
Enter the numeric UID or GID, matching the selected ID Type.
AccessDisplays when Enable ACL is selected and Add is clicked.
Select the level of access privileges to assign to the user or group matching the ID. Options are Read Access, Modify Access, or FULL_CONTROL Access.
Force FlagDisplays when Enable ACL is selected.
Select to apply the configured ACL settings to a directory containing existing data.

ixVolume (Dataset created automatically by the system)

Use to configure a storage mount for a system created dataset on the applications pool.

SettingDescription
Read OnlySelect to make the mount path inside the container read-only and prevent the app from using the path to store data.
Mount Path(Required) Enter the path/to/directory where the ixVolume mounts inside the container.
Enable ACLSelect to enable custom Access Control List (ACL) entries for the container mount and display ACL settings fields.
Dataset NameEnter a name for the dataset that is created and used for storage.
ACL EntriesDisplays when Enable ACL is selected.
Click Add to display a block of ACL entry settings.
ID TypeDisplays when Enable ACL is selected and Add is clicked.
Select Entry is for a USER or Entry is for a GROUP.
IDDisplays when Enable ACL is selected and Add is clicked.
Enter the numeric UID or GID, matching the selected ID Type.
AccessDisplays when Enable ACL is selected and Add is clicked.
Select the level of access privileges to assign to the user or group matching the ID. Options are Read Access, Modify Access, or FULL_CONTROL Access.

SMB/CIFS Share (Mounts a volume to a SMB share)

Use to mount an SMB share with a Docker volume.

SettingDescription
Read OnlySelect to make the mount path inside the container read-only and prevent the app from using the path to store data.
Mount Path(Required) Enter the path/to/directory where the share volume mounts inside the container.
Server(Required) Enter the IP address for the SMB server, for example 192.168.1.100. This can be the TrueNAS host.
Path(Required) Enter the name of the SMB share, for example my-share.
Username(Required) Enter the username of an account with permission to access the SMB share.
Password(Required) Enter the password for the account in Username.
DomainEnter the directory services domain. Only required if the domain is something other than the TrueNAS default WORKGROUP, for example on systems with Active Directory configured.

Tmpfs (Temporary directory created on the RAM)

Use to configure a memory-backed temporary directory. See the Docker tmpfs documentation for more information.

SettingDescription
Read OnlySelect to make the mount path inside the container read-only and prevent the app from using the path to store data. Not recommended for memory-backed storage.
Mount Path(Required) Enter the path where the memory-backed directory mounts inside the container.
Tmpfs Size Limit (in Mi)(Required) Enter the maximum size of the temporary directory in mebibytes. Defaults to 500.

Resources Configuration Settings

Resources Configuration settings configure resources for the container.

Resource limits specify the CPU and memory limits to place on the container.

GPU Configuration settings configure GPU device allocation for application processes. Settings only display if the system detects available GPU device(s). See Allocating GPU for more information.

Resources Configuration Settings
Figure 14: Resources Configuration Settings
Settings Information
SettingDescription
Enable Resource LimitsSelect to enable resource limits and display the CPUs and Memory (in MB) settings.
CPUsEnter the maximum number of CPU cores the container can access. For example, 2.
Memory (in MB)Enter the number of megabytes you want to limit memory to. For example, 4096.
Passthrough available (non-NVIDIA) GPUsSelect to allow the passthrough of non-NVIDIA GPU devices to the container.
Select NVIDIA GPU(s)Displays if compatible NVIDIA GPU device(s) are installed and detected.
Use this GPUSelect to allow passthrough of the specified NVIDIA device to the container.

Add Custom App Screen

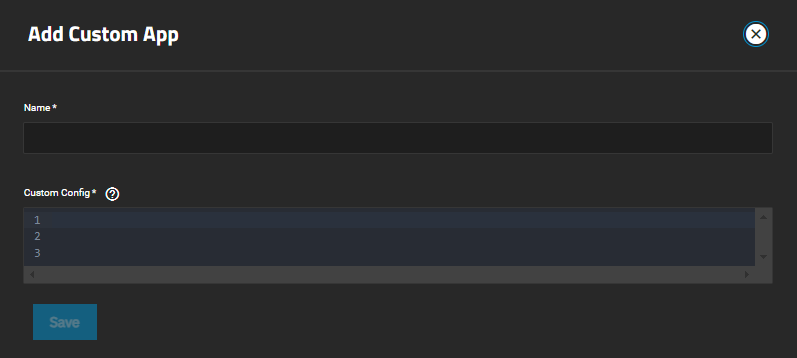
The Add Custom App screen allows you to configure third-party applications using Docker Compose YAML syntax. Use the YAML editor to configure applications not included in the official catalog. See the Docker Compose overview from Docker for more information.

Installing custom applications via YAML requires advanced knowledge of Docker Compose and YAML Syntax. Users should be prepared to troubleshoot and debug their own installations. The TrueNAS forums are available for community support.

TrueNAS applies basic YAML syntax validation to custom applications, but does not apply additional validation of configuration parameters before executing the file as written.
Install Custom App via YAML
Figure 15: Install Custom App via YAML
SettingDescription
NameEnter a name for the application to be used in the TrueNAS UI. The name must use lowercase alphanumeric characters, start with an alphabetic character, and can end with alphanumeric character. A hyphen (-) is allowed but not as the first or last character, for example abc123, abc, abcd-1232, but not -abcd.
Custom ConfigEnter a Docker Compose YAML file for the application.

Click Save to initiate app deployment.