SMB
6 minute read.
The Services > SMB screen displays after going to the Shares screen, finding the Windows (SMB) Shares section, and clicking + Config Service. Alternatively, you can go to System > Services and click the edit icon for the SMB service.
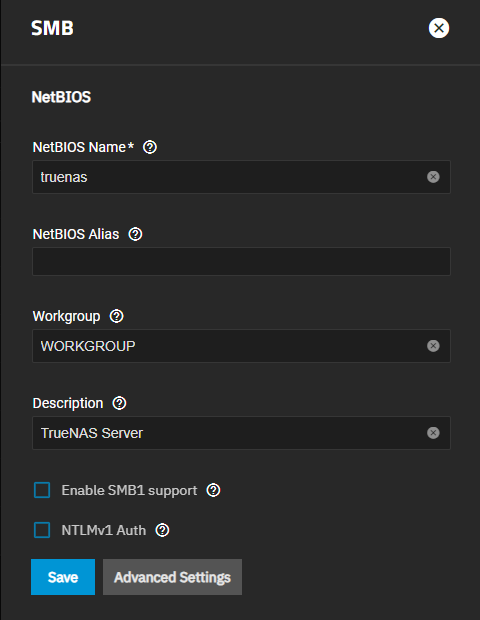
The SMB Services screen displays setting options to configure TrueNAS SMB settings to fit your use case. In most cases, you can set the required fields and accept the rest of the setting defaults. If you have specific needs for your use case, click Advanced Options to display more settings.

Enter the name of the TrueNAS host system if not the default displayed in NetBIOS Name. This name is limited to 15 characters and cannot be the Workgroup name.
Enter any alias name or names that do not exceed 15 characters in the NetBIOS Alias field. Separate each alias name with a space between them.
Enter a name that matches the Windows workgroup name in Workgroup. TrueNAS detects and sets the correct workgroup from these services when unconfigured with enabled Active Directory or LDAP active.
NetBIOS names (workgroup, domain, and computer names) are limited to 15 characters and cannot contain the following characters:
\ / : * ? " < > |Microsoft and RFC 852 define reserved words that should not be used as NetBIOS names. TrueNAS 25.04 and later enforce these restrictions through validation.
If you encounter validation errors when joining Active Directory or configuring SMB services, verify that your NetBIOS Name, Workgroup, and Domain Name comply with these requirements.
If using SMB1 clients, select Enable SMB1 support to allow legacy SMB1 clients to connect to the server. Note: SMB1 is deprecated. We advise upgrading clients to operating system versions that support modern SMB protocols.
If you plan to use the insecure and vulnerable NTLMv1 encryption, select NTLMv1 Auth to allow smbd attempts to authenticate users. This setting enables backward compatibility with older versions of Windows, but we do not recommend it. Do not use on untrusted networks.
Enter any notes about the service configuration in Description.
For more advanced settings, see SMB Services Screen.
Click Save.
Start the SMB service.
TrueNAS and Samba default behavior for SMB transport encryption allows SMB clients to negotiate different encryption levels for shares. This default setting enables negotiating encryption but does not turn on data encryption globally per share. SMB1 and SMB2 provide different settings to change the level of global or per-share SMB encryption applied to connections. See Samba Server SMB Encrypt(s) for more information.
You can change the SMB service to apply different SMB transport encryption levels to suit your use case. Go to the SMB service, found on the System > Services screen, and click Edit for the SMB service to open the SMB Service screen, then click on Advanced Settings.
Click in the Transport Encryption Behavior field to select the option and behavior you want applied:
- Default - follow upstream/TrueNAS default
- Negotiate - only encrypt transport if explicitly requested by the SMB client
- Desired - encrypt transport if supported by client during session negotiation
- Required - always encrypt transport (rejecting access if client does not support encryption - incompatible with SMB1 server
enable_smb1)
Select the Default option to use the TrueNAS current behavior. If set to default, there is no technical limitation preventing an SMB client from negotiating an encrypted session if required.
If you are concerned about having Windows SMB clients always using signing in your environment, make a GPO change on the client side to always sign SMB2+ traffic. This defaults to the Windows settings digitally sign communications (always) and to off.
For more information on Windows SMB-client side transport encryption, see Windows SMB Signing Policies.
To monitor SMB service event logs, such as when a client attempts to authenticate to the share, use the TrueNAS auditing screen. Go to System > Audit to review event logs, including SMB connect, disconnect, create, read or write events, and others.
Enter SMB in the search bar to view only SMB service logs or use the advanced search to further limit results.


