Setting Up a Network VLAN
4 minute read.
A virtual LAN (VLAN) is a partitioned and isolated domain in a computer network at the data link layer (OSI layer 2). Click here for more information on VLANs.
TrueNAS uses vlan(4) to manage VLANs.
Before you begin, make sure you have an Ethernet card connected to a switch port and configured for your VLAN. Ensure that you have also preconfigured the VLAN tag in the switched network. Consult with your IT department to obtain this VLAN tag if you are not the network administrator for your systems.
You can lose your TrueNAS connection if you change the network interface that the web interface uses!
If your network changes result in lost communication with the network and you need to return to the DHCP configuration, you can refer to the information below to restore communication with your server. Lost communication might require an IPMI or physical connection to the system, and reconfiguring your network settings using the Console Setup menu.
To prepare before making changes:
Have the DNS name server addresses, the default gateway for the new IP address, and any static IP addresses on hand before making network changes. You only have 60 seconds to change and test new network settings before they revert to the current settings. For example, back to DHCP assigned if moving from DHCP to a static IP.
Back up your system to preserve your data and system settings. Save the system configuration file and a system debug.
Grab a screenshot of your current settings in the Global Configuration widget as a precautionary step.
Before making network interface changes:
- Stop running apps.
- Power off running virtual machines (VMs) and containers.
- Remove active NIC devices for VMs and containers.
Changing IP address(s) assigned to the primary interface can cause issues with access, so it is best to make changes outside normal working hours.
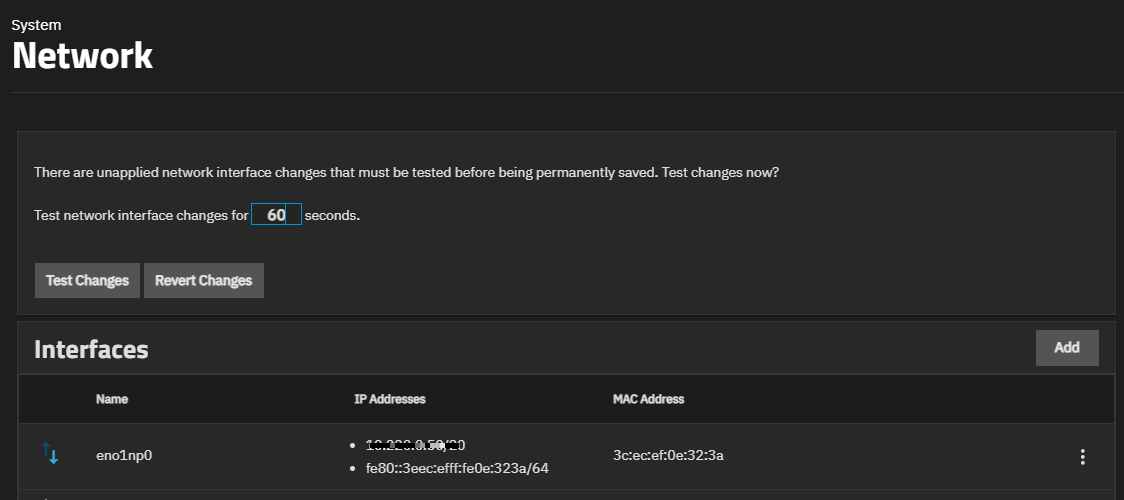
TrueNAS protects your connection to the interface by displaying the Test Changes option on the Network screen after you make and save changes to the network interface.
TrueNAS shows the unapplied changes widget above the Interfaces widget after saving network changes.
Click the Test Changes button to test access to the UI after making a change and before making it a permanent change. This safeguard is intended to prevent changes that can break access to the UI.
Revert Changes discards any changes made to the interface within the same 60-second period.
The test timer starts after you click Save on the Add Interface or Edit Interface screens. After clicking Test Changes, wait a few moments to give the interface time to initialize, and then refresh the browser until you see the Save Changes button or follow the steps below to test in a new browser tab. Click Save Changes to make the changes permanent.
To test the change in a different browser tab:
Click Test Changes.
(Optional) Click on 60 and enter a new number to change the time allotted to test the network change before changes automatically revert.
Immediately open a new browser window. Do not close the existing login session tab.
Enter the new IP address in the browser URL field of the new browser window, and press Enter. The TrueNAS login screen displays.
Enter your administrator login credentials to access the system.
Go to Network and click Save Changes to make the changes permanent.
If the timer expires before you save the changes, TrueNAS reverts to the settings before you made the change. Return to the original browser session, to re-enter your interface changes, click Save, then repeat the steps above.
If you cannot access the UI, return to the original browser session and click Revert Changes on the Network screen.
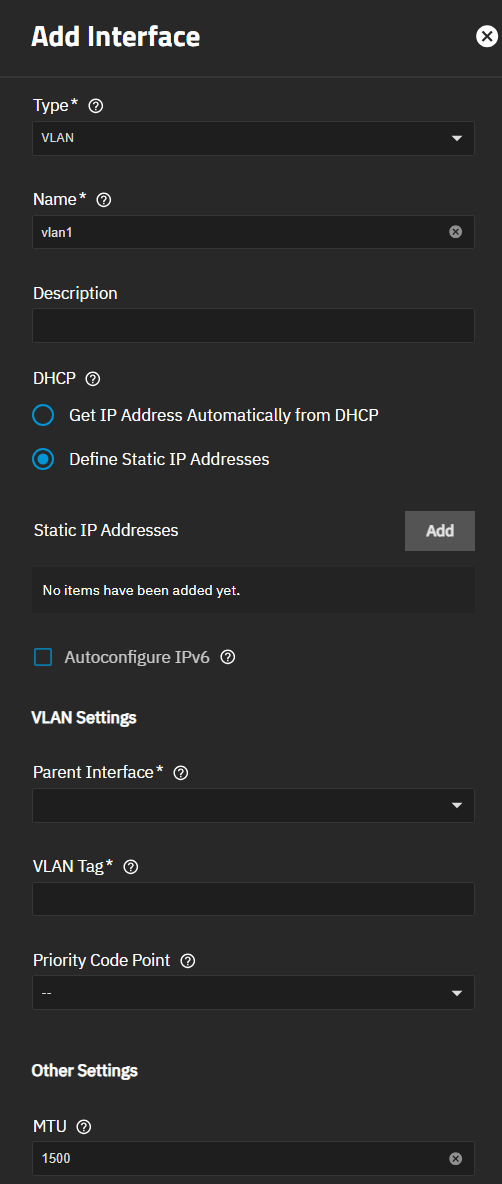
To set up a VLAN interface, go to Network, click Add on the Interfaces widget to open the Add Interface screen, then:
Select VLAN from the Type dropdown list. You cannot change the Type field value after clicking Apply.
Name populates with the default name vlan1. You cannot change the Name of the interface after clicking Save.
Leave Define Static IP Addresses selected under DHCP.
(Optional, but recommended) Enter any notes or reminders about this VLAN in Description.
Select the interface in the Parent Interface dropdown list. This is typically an Ethernet card connected to a switch port already configured for the VLAN.
Enter the numeric tag for the interface in the VLAN Tag field. This is typically preconfigured in the switched network.
Select the VLAN Class of Service from the Priority Code Point dropdown list.
(Optional) Click Add to the right of Aliases to show additional IP address fields for each additional IP address to add to this VLAN interface.
Click Save.
Test the network change when prompted.


