Interface Configurations
14 minute read.
TrueNAS supports configuring different types of network interfaces such as a standard interface, network bridge, LAGG, and VLAN interfaces to use as part of the various backup, sharing, and virtualization features in TrueNAS. The tutorials in this section guide you through each of the various network interface configurations.
The Network screen shows network settings for interfaces, global network settings, adding static routes, and IPMI connections. This article describes adding new or changing existing network interfaces. For information on configuring IPv6 addresses, see Configuring IPv6.
You must know the DNS name server and default gateway addresses for your IP address.
You can lose your TrueNAS connection if you change the network interface that the web interface uses!
If your network changes result in lost communication with the network and you need to return to the DHCP configuration, you can refer to the information below to restore communication with your server. Lost communication might require an IPMI or physical connection to the system, and reconfiguring your network settings using the Console Setup menu.
To prepare before making changes:
Have the DNS name server addresses, the default gateway for the new IP address, and any static IP addresses on hand before making network changes. You only have 60 seconds to change and test new network settings before they revert to the current settings. For example, back to DHCP assigned if moving from DHCP to a static IP.
Back up your system to preserve your data and system settings. Save the system configuration file and a system debug.
Grab a screenshot of your current settings in the Global Configuration widget as a precautionary step.
Before making network interface changes:
- Stop running apps.
- Power off running virtual machines (VMs) and containers.
- Remove active NIC devices for VMs and containers.
Changing IP address(s) assigned to the primary interface can cause issues with access, so it is best to make changes outside normal working hours.
TrueNAS uses DHCP to assign an IP address to the primary network interface during installation to provide access to the web UI. DHCP provides the IP address for only one network interface.
After initially installing TrueNAS, you can change the DHCP-assigned IP address to a static IP address by:
- Using the Console Setup menu
- Logging into the UI using the DHCP-assigned IP address, and going to the Network screen and editing the interface
We recommend using the UI to make network changes as it has safeguards in place to prevent you from losing access to the system due to incorrectly configured interfaces.
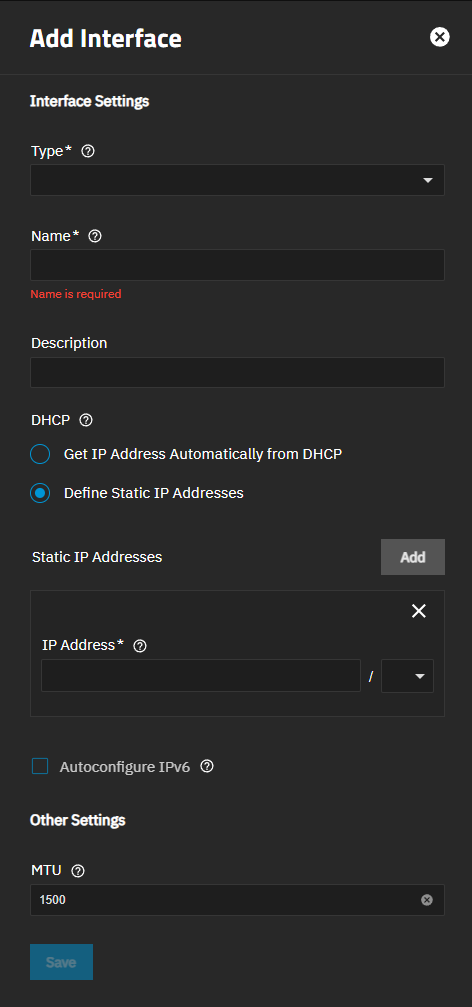
To add another network interface in the UI, go to System > Network and click Add on the Interfaces widget to open the Add Interface screen.
You must specify the type of interface to create. Select the interface type from the Type dropdown options: Bridge, Link Aggregation (LAGG), or VLAN (virtual LAN). The interface type cannot be changed after clicking Save.
To revert the interface to default network settings, select Reset Configuration on the for the interface. This resets the interface from a static IP address to a DHCP-assigned address and resets the domain to the TrueNAS default local.
Enter a name for the interface using the format that corresponds to the type of interface you are adding. Naming differs between physical and virtual interfaces. The name assigned to the primary physical network interface on your system is based on the systemd predictable naming scheme, and reflects the hardware type and location. The names vary based on your hardware configuration. For example, eno1 for onboard NICs, ens3 for PCIe slot NICs, and you might see eno1np0, which is an onboard NIC with more than one port on the NIC.
When selecting a virtual interface type, enter a name based on the type. For example, bondX, vlanX, or brX and where X is a number.
To allow DHCP to assign the interface IP address, select Get IP address Automatically from DHCP.
To use a fixed (static) IP address, select the Define Static IP Addresses, and then click Add to the right of Static IP Addresses to show the IP address and netmask (CIDR) fields. Enter the assigned IP address and select the netmask from the dropdown list.
Click Add for each IP address you want to associate with the interface.
If adding an IPv6 IP address, refer to Configuring IPv6 for details on this type of network configuration.
Click Save when you are certain of your configuration. You cannot change the interface type or name after clicking Save!
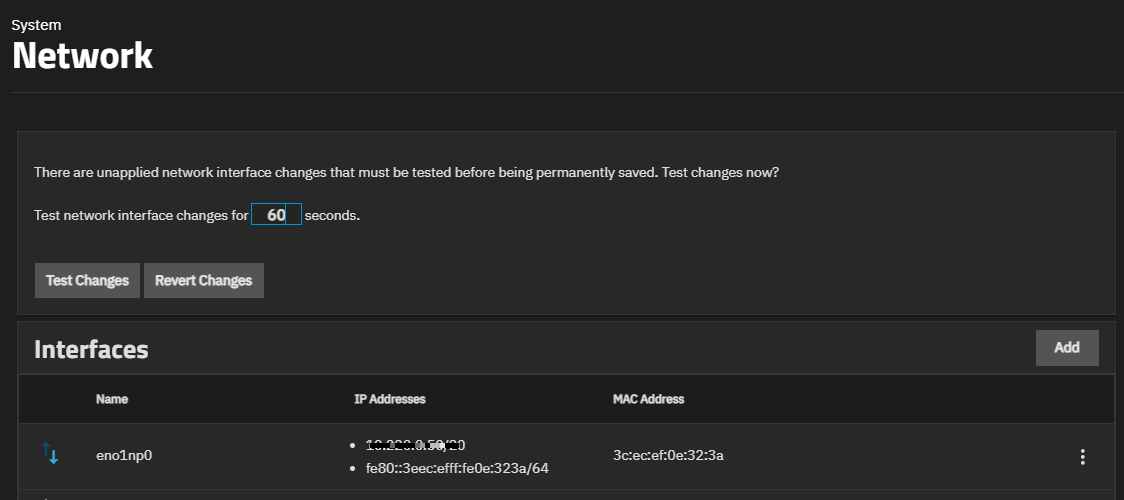
TrueNAS protects your connection to the interface by displaying the Test Changes option on the Network screen after you make and save changes to the network interface.
TrueNAS shows the unapplied changes widget above the Interfaces widget after saving network changes.
Click the Test Changes button to test access to the UI after making a change and before making it a permanent change. This safeguard is intended to prevent changes that can break access to the UI.
Revert Changes discards any changes made to the interface within the same 60-second period.
The test timer starts after you click Save on the Add Interface or Edit Interface screens. After clicking Test Changes, wait a few moments to give the interface time to initialize, and then refresh the browser until you see the Save Changes button or follow the steps below to test in a new browser tab. Click Save Changes to make the changes permanent.
To test the change in a different browser tab:
Click Test Changes.
(Optional) Click on 60 and enter a new number to change the time allotted to test the network change before changes automatically revert.
Immediately open a new browser window. Do not close the existing login session tab.
Enter the new IP address in the browser URL field of the new browser window, and press Enter. The TrueNAS login screen displays.
Enter your administrator login credentials to access the system.
Go to Network and click Save Changes to make the changes permanent.
If the timer expires before you save the changes, TrueNAS reverts to the settings before you made the change. Return to the original browser session, to re-enter your interface changes, click Save, then repeat the steps above.
If you cannot access the UI, return to the original browser session and click Revert Changes on the Network screen.
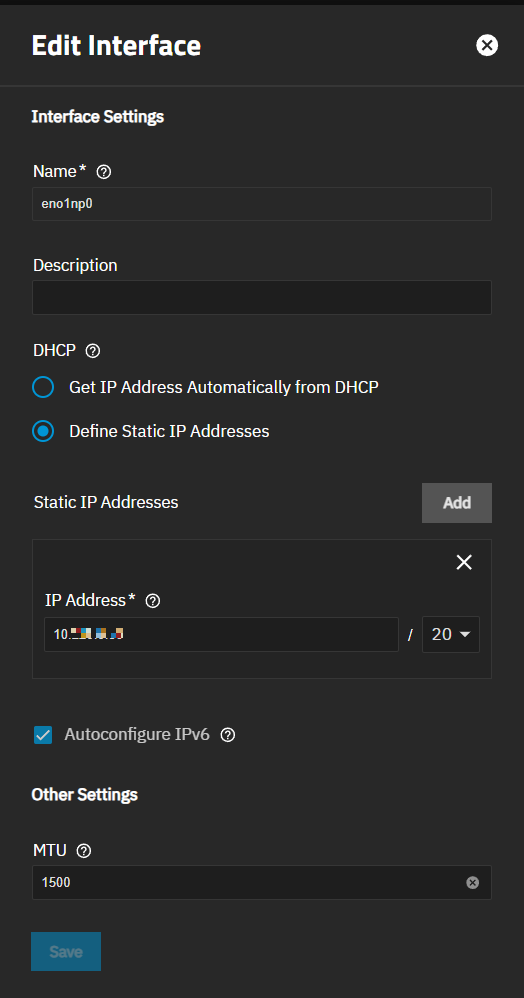
To change an existing interface, click on the icon at the right of the interface, and then click Edit to open the Edit Interface screen.
The Edit Interface and Add Interface screen settings are identical, but the Type and Name fields are not editable for an existing interface. If you created the wrong type of virtual interface (i.e., a bridge, vlan, lagg), delete the interface and add a new interface with the correct type.
When changing from a DHCP-provided IP address to a static IP, first verify your current default gateway and name servers work with the new IP address. You must add the new default gateway and DNS name servers that work with the new IP address to the global configuration. If you need to change these settings, do this before you change the interface so you can test the interface change.
Click Save after making all changes.
Test the change as described above in Testing Network Interface Changes.
Resetting the configuration for a network interface can result in lost access to the TrueNAS UI and losing the connection to TrueNAS!
Clicking Reset Configuration resets the domain name back to the default value, and changes the static IP address to DHCP-assigned.
When saved, changes cause lost access to the UI. You might need command line knowledge, and either IPMI or physical access to the TrueNAS system to fix misconfigured network settings. If using IPMI or a physical connect to the system, you can change network and interface settings through the Console Setup menu.
The TrueNAS UI does not offer a way to delete the interface. Do not delete the primary network interface in the CLI!
Click on the dropdown list for the interface, then select Reset Configuration. The current IP address resets to a DHCP-assigned IP address and the domain name reverts to the default setting.
Confirm validates the reset activity and activates the Reset button.
Reset clears the configuration for that interface. After making the changes and clicking Save, the test change options show on the Network screen. Follow the procedure above to test your changes and validate you still have access to the UI and the TrueNAS system.
TrueNAS allows assigning static IP addresses to an interface when not using a DHCP-assigned address. Static IP addresses set a fixed address for an interface that external devices or websites need to access or remember, such as for VPN access. You can add an additional IP address for a network interface configured with another primary IP address.
Verify the default gateway and nameservers for the DHCP-assigned address and new static IP address are the same before making a change. If not the same, edit the global network settings before changing the interface so you can properly test the change.
If in an IPMI session, you can use the Console Setup menu to change settings. Enter 2 to configure general network settings like the default gateway and name servers.
To use the UI to change an interface from DHCP to a static IP address, go to System > Network:
Verify the default gateway and name servers work with the new static IP address. If not, click the link above and follow the instructions to update the global network settings.
Click on the icon for the interface, and then click Edit to open the Edit Interface screen.
Select the Define Static IP Addresses option.
Click Add to the right of Static IP Addresses to show the IP address and netmask (CIDR) fields. Click Add for each static IP address you want to add to this interface.
Enter the IP address and select the netmask value for each static address you add. Multiple interfaces cannot be members of the same subnet!
If an error displays or the Save button remains inactive when setting the IP addresses on multiple interfaces, check the subnet and ensure the netmask (CIDR) numbers are different.
Click Save.
Click Test Changes when prompted. Follow the procedure above to test nework changes.
Only one interface can use DHCP to assign the IP address and that is likely the primary network interface. If you do not have an existing network interface set to use DHCP you can convert an interface from static IP to DHCP.
To switch back to using DHCP:
Click on the icon for the interface, and then click Edit to open the Edit Interface screen.
Select Get IP Address Automatically from DHCP.
Click Save.
Verify the current default gateway and name servers work with the new DHCP-assigned IP address. If yes, test the network change. Click on 60 above the Test Changes button to extend the number of seconds you have to test the network change.
If the current settings do not work with the new DHCP-assigned IP address, click the link in the Changing from DHCP to a static IP Address section, and follow the directions to change these settings.
Click test the network change
If the test network operation fails or the system times out, your system returns to the network settings before you attempted the change. Edit the global network settings and click save, then edit the interface and click save. Test the network changes again.


