Setting Up a Local Replication Task
9 minute read.
A local replication creates a ZFS snapshot and saves it to another location on the same TrueNAS system using different pools, datasets, or zvols. This allows users with only one system to take quick data backups or snapshots of their data when they have only one system.
If you have only one pool, create a dataset in that pool to store the replication snapshots. You can use a zvol for this purpose. If configuring local replication on a system with more than one pool, create a dataset for the replicated snapshots on one of those pools.
While we recommend regularly scheduled replications to a remote location as the optimal backup scenario, local replication is useful when a remote backup location is available or when a disk is in immediate danger of failure.
Storage space you allocate to a zvol is only used by that volume, it does not get reallocated back to the total storage capacity of the pool or dataset where you create the zvol if it goes unused. Plan your anticipated storage need before you create the zvol to avoid creating a zvol that exceeds your storage needs for this volume. Do not assign capacity that exceeds what is required for TrueNAS to operate properly. For more information, see TrueNAS Hardware Guide for CPU, memory and storage capacity information.
Setting up replication tasks as an admin user has a few differences from setting up replication tasks when logged in as root.
The first snapshot taken for a task creates a full file system snapshot, and all subsequent snapshots taken for that task are incremental to capture differences occurring between the full and subsequent incremental snapshots.
Scheduling options allow users to run replication tasks daily, weekly, monthly, or on a custom schedule. Users also have the option to run a scheduled job on demand.
Local replication does not require the admin user to have SSH access, a home directory, or sudo command permissions. Setting options change based on the source and destination selections. Replicating to or from a local source does not require an SSH connection.
Set up the data storage for replicated snapshots. Go to Datasets to add a dataset to store the replicated data (snapshots). TrueNAS does not allow you to create a new dataset using the Source file browser in the replication wizard or the Add Replication Task configuration screen. Use the file browser to select the existing dataset on the system where you want to store replicated data.
The Destination file browser allows you to specify (create) a directory in an existing dataset on a local or remote system, but you cannot create a directory for a dataset selected in the Source file browser.
Create a periodic snapshot task of the storage locations to back up. TrueNAS typically creates a periodic snapshot task right before it performs the replication task if one is not already created for the task. You might need to refresh the screen cache to see the task listed in the Periodic Snapshot Task widget.
Go to Data Protection > Replication Tasks and click Add to open the Replication Task Wizard.
If you want to configure a replication task using advanced setting options on the Add Replication Task screen, click Advanced Replication Creation before entering settings in the replication wizard. Settings do not carry over from the wizard to the advanced task creation screen, and TrueNAS shows the dialog where you must confirm you want to leave the wizard screen before it opens. Immediately switching to the advanced screen does not show the confirmation dialog, and you do not have to enter your settings again.
To configure the local replication task, follow the instructions in the section below.
Use the Replication Task Wizard to create and copy ZFS snapshots to another system, which streamlines creating simple replication tasks. After creating the replication task, TrueNAS automatically creates a periodic snapshot task for sources that have no existing snapshots.
If you have an existing replication task, you can select it on the Load Previous Replication Task dropdown list. This loads the configuration settings for that task into the wizard, where you can make changes such as assigning it a different destination, setting a new schedule, or retention lifetime, etc. Saving changes to the configuration creates a new replication task without altering the task originally loaded into the wizard. This saves some time when creating multiple replication tasks between the same two systems.
Before you begin configuring the replication task, first verify that the destination dataset where you plan to store the replication snapshots is free of existing snapshots, or that snapshots with critical data are backed up before you create the task.
After completing the basic preparation steps in the section above, go to Data Protection > Replication and click Add to open the replication wizard. To configure advanced settings, click Advanced Replication Creation to open the Add Replication Task screen before you enter any settings in the wizard. Refer to the Advanced Replication Tasks for configuration instructions using the Add Replication Task screen.
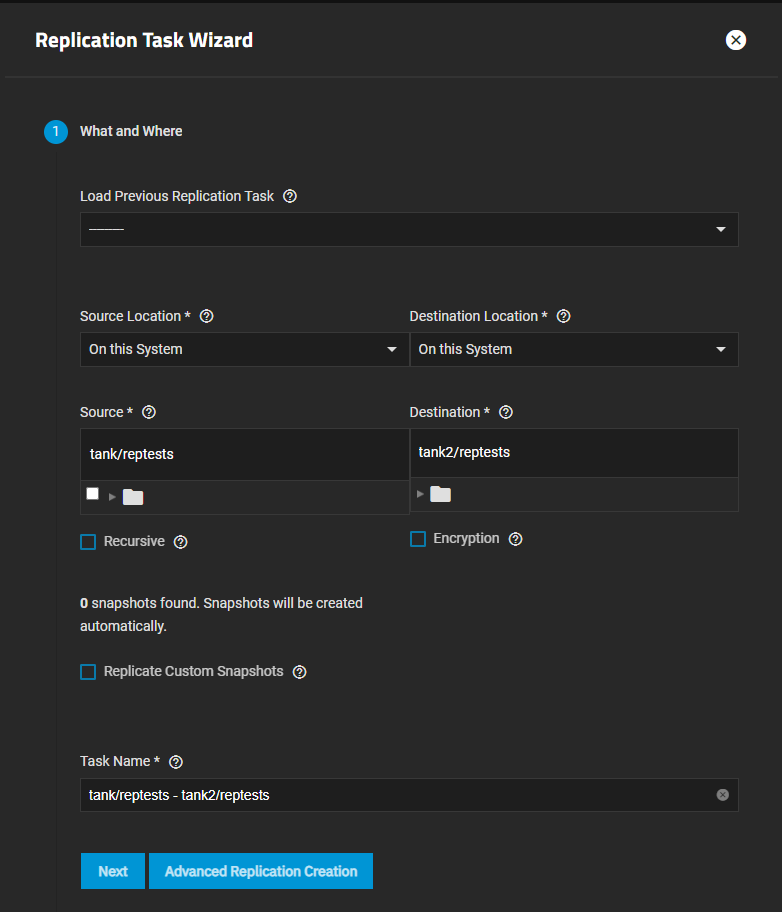
On the What and Where replication wizard screen:
Select an existing replication task from the Load Previous Replication Task dropdown. If one does not exist, leave this set to the default, which is the double dashes.
Select the source and destination locations. You can select these in any order. Local replication sends or receives data from one storage location to another on the same (local) system. Remote replication sends data to or receives data from a storage location on a different (remote) TruNAS system.
To set up a local replication in the replication wizard, set both Source Location and Destination Location to On this System.
To set up a push remote replication in the replication wizard, set the Source Location to On this System and set Destination Location to On a Different System. To set up a pull remote replication in the replication wizard, set the Source location to On a Different System and the Destination Location to On this System.
Setting either source or destination to On a Different System automatically sets the other to On This System. You cannot set both to On a Different System.
Click on Source Location or Destination Location to show additional setting options and the file browser. Additional settings shown are based on the selection.
Configure the settings for local replication after selecting On This System in either Source Location or Destination Location.
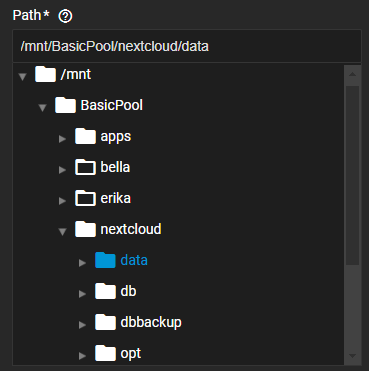
a. Use the file browser for Source Location to browse to the location of the dataset with the data to replicate. Clicking on the dataset(s) populates the Source path.
When setting up the Source, you can select multiple sources or manually type the names into the Source field.
b. Use the file browser for Destination Location to browse to the location of the pool or dataset to receive the replicated snapshots. Clicking on the dataset populates Destination path.
When setting up the Destination, the Destination path allows adding a directory/dataset by entering /name, where /name is the name of a directory or dataset. The source path does not allow adding a new dataset/directory. You can use zvols as a local replication destination. Add a name to the end of the path to create a new dataset in that location.
c. (Optional) Enter a name for the snapshot in Task Name. TrueNAS populates this field with the default name using the source and destination paths separated by a hyphen, but this default can make locating the snapshot in the destination dataset a challenge. To make it easier to find the snapshot, give it a name that is easy for you to identify. For example, a replicated task named dailyfull for a full file system snapshot taken daily.
(Optional) Select Recursive to replicate all snapshots contained within the parent dataset and any child datasets.
(Optional) Accept the default name in Task Name, or enter a name of your choosing. TrueNAS populates this field with a default name using the source and destination paths separated by a hyphen, but this default can make locating the snapshot in the destination dataset a challenge. To make it easier to find the snapshot, give it a name that is easy to identify. For example, a replicated task named dailyfull for a full file system snapshot taken daily.
Click Next to show the scheduling options.
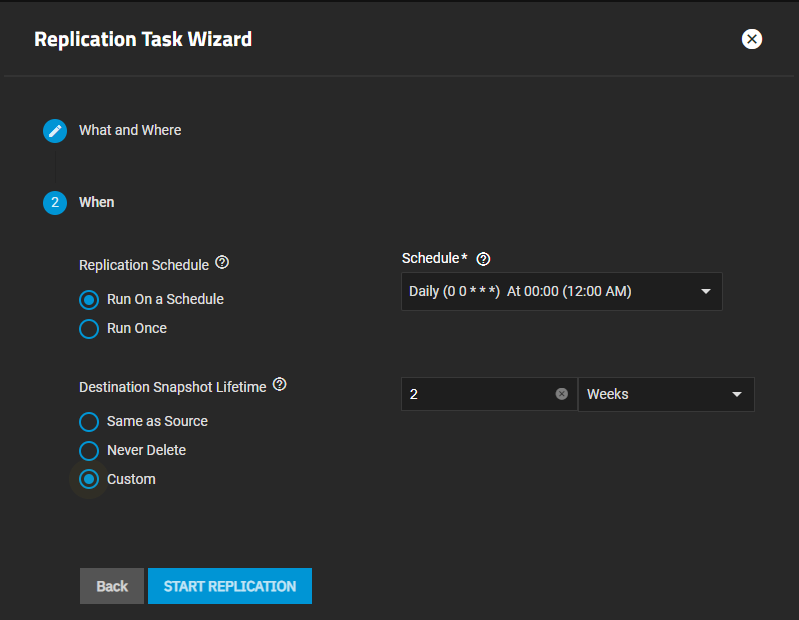
Select the schedule and snapshot retention lifetime.
LeaveReplication Schedule set to Run On a Schedule and select the option in the Schedule dropdown. Select Run Once to set up a replication task you run one time.
Select the Destination Snapshot Lifetime option to specify how long TrueNAS should store copied snapshots in the destination dataset before TrueNAS deletes it. Same as Source is selected by default. Select Never Delete to keep all snapshots until you delete them manually. Select Custom to show two additional settings, then enter the number of the duration you select from the dropdown list. For example, 2 Weeks.
Click Save.
The task shows on the Replication Task widget with the status as PENDING.
Select Run Now if you want to run the task immediately.
Click the task State to open a dialog with the log for that replication task.
To see the replication snapshots, go to Datasets, select the destination dataset on the tree table, then select Manage Snapshots on the Data Protection widget to see the list of snapshots in that dataset. Click Show extra columns to add more information columns to the table, such as the date created, which can help you locate a specific snapshot or enter part of or the full name in the search field to narrow the list of snapshots.
For information on replicating encrypted pools or datasets, see Setting Up an Encrypted Replication Task.


