Using the Console Setup Menu
8 minute read.
The Console Setup menu displays at the end of the
By default, TrueNAS does not display the Console Setup menu with SSH or web shell connections. The admin user, the root user (if enabled), or another user with administrator or root-level permissions can start the Console Setup menu by entering this command:
/usr/bin/cli --menu
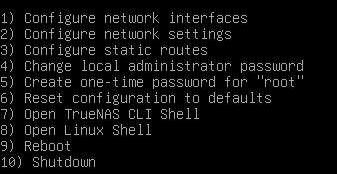
The menu provides several options:
For network configuration options 1, 2, and 3, we recommend using the TrueNAS UI to configure network interfaces, as it has safeguards to prevent breaking network access to TrueNAS.
1) Configure network interfaces
Use this to configure the primary network interface with a static IP. This is for switching away from the DHCP-assigned IP address TrueNAS provides when the system boots after installing TrueNAS. Also, use this to set up other network interfaces or to add alias IP addresses, also referred to as static IP addresses, for the primary interface.
2) Configure network settings
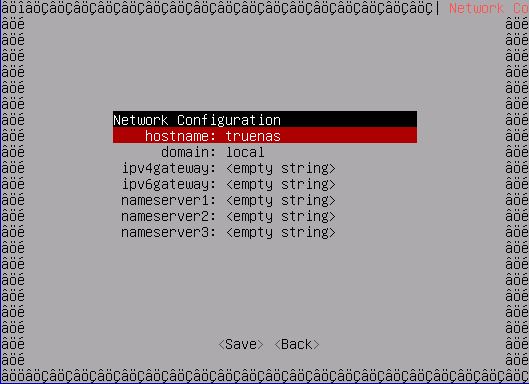
Use this to set up the network default gateway, host name, domain, IPv4 gateway and DNS name servers. Configured options display in the Global Configuration widget in the web UI Network screen.
3) Configure static routes
Use this to set up static IP routes, but this is not required as part of the initial configuration setup.
4) Change local administrator password
Use to change the administrator user password. If you selected option 1 on the iso installer menu, you have already configured the truenas_admin user and password. You can use this to change the admin password before you log into the TrueNAS UI. Note that TrueNAS begins warning all local account types (administrator, full admin, read-only, and sharing-only) seven days before password expiration. After expiration, the account locks and requires administrative action to unlock.
This is not the password for the root user in the CLI or the root user login password for the web UI. The root user password is disabled by default as part of security hardening. Activating the root user is not recommended.5) Create one-time password for “root”
Use to create a one-time password for the root user. This is intended for quick authentication to the web interface to further set up secure log ins.
After you generate a one-time password, it remains valid for one login within 24 hours and does not persist across reboots. You must set a new password after you log in.
6) Reset configuration to defaults
Use to wipe all system configuration settings and return the system to a fresh install state.
7) Open TrueNAS CLI Shell
Use to start a shell for running TrueNAS commands, or use the TrueNAS UI System Settings > Shell. Type
exitto leave the shell.8) Open Linux Shell
Use to start a shell window for running Linux CLI commands. Configuration changes made do not write to the database and reset on each system boot. We do not recommend using the Linux shell unless you are an advanced user. Type
exitto leave the shell.9) Reboot
Restart the system by powering down and then automatically powering on the system.
10) Shut down
Use to power down the system.
During the first boot, TrueNAS attempts to connect to a DHCP server from all live interfaces. If it receives an IP address, the Console Setup menu displays it under The web user interface is at: so you can access the TrueNAS web UI.
You might be able to access the web UI using a hostname.domain command at the prompt (default is truenas.local) if your system:
- Does not have a monitor.
- Is on a network that supports Multicast DNS (mDNS).
You can either use TrueNAS UI or the Console Setup menu to configure your network settings for the primary network interface or other interfaces such as a link aggregate (LAGG) or virtual LAN (VLAN), or aliases for an interface, and to configure other network settings such as the default gateway, host name, domain, and the DNS name servers, or add static routes.
We recommend that only experienced administrators familiar with network configuration and the Console setup menu use it and that less experienced and knowledgeable system administrators use the TrueNAS UI to configure your network interfaces and other network configuration settings. The TrueNAS UI includes safety measures to prevent you from completely disrupting network connectivity for your TrueNAS if you make a mistake with network interface settings.
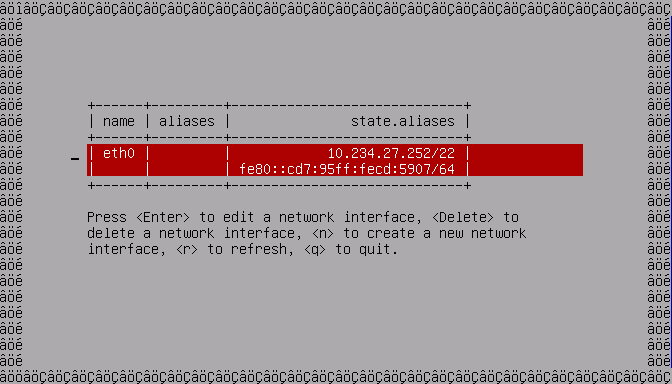
Enter 1 to display the Configure Network Interfaces screen and select the interface settings.
Follow the instructions on the screen to configure an IP for a network interface. Type n to open the new interface screen or press Enter to edit the existing interface.
You can enter aliases for an interface when you create a new one or edit an existing interface.
Type q to return to the main Console Setup menu screen.
Enter 2 to display the Network Settings screen to set up the host name, domain, default gateway and name servers. You can also add these settings using the web UI.
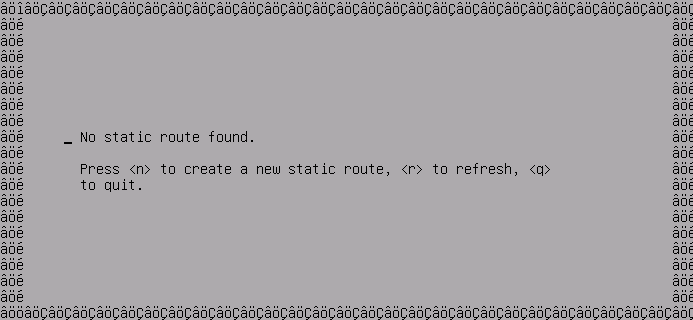
Enter 3 to display the Static Route Settings screen to set up static routes. You can also add static routes in the web UI.
TrueNAS uses DHCP to assign the IP address required to access the TrueNAS UI and displays it on the Console Setup Menu screen, and it sets the host name to truenas.
If you do not plan to use the DHCP-assigned network addresses provided by TrueNAS, identify your host and domain names, the static or fixed IP addresses you plan to assign to your network interface card(s), the default gateway, subnet mask(s), and the DNS name servers in your network.
All other users should have their network information ready before starting to configure network settings. This makes the process go faster and reduces the risk of issues when you configure TrueNAS.TrueNAS Enterprise
For Enterprise systems, have your network information ready to provide to TrueNAS Support when they guide you through your configuration.
To use the Console Setup menu to change the network interface IP address:
- Type 1 and then press Enter to open the Configure Network Interfaces screen.
- Use either Tab or the arrow keys to select the interface to use as your primary network interface if you have more than one interface installed and wired to your network.
- Enter in the IP address, then use either Tab or the arrow keys to move through the menu and down to select Save, and then press Enter. After saving, enter q to return to the main Console Setup menu.
To configure the default gateway, host name, domain and DNS name severs using the Console Setup menu type 2 and then press Enter to open the Network Settings screen.
To configure network settings in the TrueNAS UI, enter the IP address displayed on the Console Setup menu screen in a browser URL field and press Enter.
Log in with the admin user name and password set for the administration user during the
Home users have a few options to allow Internet access using TrueNAS:
- Use 8.8.8.8 as the DNS nameserver address
- Use your ISP provider DNS servers (contact them for assistance with these addresses)
- Use 1.1.1.1 for Cloudflare
- Use 9.9.9.9 for Quad9
TrueNAS has implemented administrator account logins as replacements for the root user. The truenas_admin user account is the default account, and the root password is now disabled by default. If you migrate from FreeBSD- to Linux-based TrueNAS releases and need to upload the previous system configuration file, the root user password is not disabled but you must recreate the truenas_admin (or an admin) user account and disable the root password to comply with FIPS-compliance standards and security hardening practices.
Existing TrueNAS systems migrating from earlier TrueNAS release with the admin user retain this administrator account.
Only a clean install using a TrueNAS 24.10
Changing an admin user (or root if you have not created the admin user) password disables 2FA (Two-Factor Authentication) and removes the 2FA secret for that user.
Disabling a password in the UI prevents the user from logging in with it. If both the root and local admin user passwords are disabled and the web interface session times out with these passwords disabled, TrueNAS provides a temporary sign-in screen to allow logging into the UI. Immediately go to the Credentials > Local User screen, select the admin user, click Edit and re-enable the password.
Caution! Resetting the configuration deletes all settings and reverts TrueNAS to default settings. Before resetting the system, back up all data and encryption keys/passphrases! After the system resets and restarts, you can go to Storage and click Import Pool to re-import pools.
Enter 5 in the Console Setup menu, then enter y to reset the system configuration. The system restarts and reverts to default settings.
After setting up network requirements, log into the web UI to complete your system setup by:
- [Completing network configuration] (/scale/scaletutorials/network/) if not already set up using the Console Setup menu.
- Setting up storage
- Setting up sharing
- Backing Up your configuration


