




TrueNAS Development Documentation
This content follows experimental development changes in TrueNAS 28, a future version of TrueNAS.
Use the Product and Version selectors above to view content specific to a stable software release.
Encrypting Datasets
13 minute read.
TrueNAS offers ZFS encryption for your sensitive data in pools, datasets, and zvols. Encrypting pools is not recommended!
Data-at-rest encryption is available with:
- Self Encrypting Drives (SEDs) using OPAL or FIPS 140.2 (Both AES 256)
- Encryption of specific datasets (AES-256-GCM)
The local TrueNAS system manages keys for data-at-rest. Users are responsible for storing and securing their keys.
Encryption is for users storing sensitive data.
Users are responsible for backing up and securing encryption keys and passphrases! Losing the ability to decrypt data is similar to a catastrophic data loss.
It does not apply encryption to the storage vdev or the disks in the pool.
Encrypting the root dataset (pool-level encryption) creates a single point of failure. Losing one key makes the entire pool inaccessible.
Best practice Do not enable encryption during pool creation. Instead, create an unencrypted pool with individually encrypted datasets and zvols. This allows independent key management, selective unlock, isolated failures, and simplified recovery.
Encryption at the pool level forces encryption on all datasets or zvols created in the pool. You can create both encrypted and unencrypted datasets within an unencrypted pool. If you require encrypted file storage for some but not all of your data, we recommend creating a dataset with encryption and building additional datasets or zvols under this encrypted dataset for data you want to have encrypted file storage, and then build non-encrypted datasets for other datas storage needs in the same pool. Leave Encryption unselected on the Pool Creation Wizard screen to create a pool with an unencrypted root dataset.
By default, child datasets inherit encryption settings from the parent. Disabling Inherit under Advanced Options allows modifying the encryption configuration for a child dataset.
You cannot change a child dataset of an encrypted parent dataset to unencrypted. However, datasets created outside the UI, such as those created programmatically or manually via shell access, might not inherit encryption unless properly configured. For example, the ix-apps dataset on the pool selected for applications does not inherit encryption settings.
If your system loses power or you restart the system, all encrypted datasets and zvols automatically lock to protect data. Use the downloaded key (JSON file) for the root pool to unlock the pool at the root level, or the exported key for the key-encrypted dataset to unlock the dataset and the child datasets under this parent dataset. If passphrase encryption is applied, use the Unlock Datasets screen to enter the passphrase to unlock the dataset.
TrueNAS uses lock icons to indicate the encryption state of a root, parent, or child dataset in the tree table on the Datasets screen. Each icon shows a text label with the state of the dataset as locked or unlocked.
The Datasets tree table includes lock icons and descriptions that indicate the encryption state of datasets.
| Icon | State | Description |
|---|---|---|
 | Locked | Displays for locked encrypted root, non-root parent and child datasets. |
 | Unlocked | Displays for unlocked encrypted root, non-root parent and child datasets. |
 | Locked by ancestor | Displays for locked datasets that inherit encryption properties from the parent. |
 | Unlocked by ancestor | Displays for unlocked datasets that inherit encryption properties from the parent. |
Select an encrypted dataset to see the Encryption card on the Datasets screen.
The dataset encryption state is unlocked until you lock it using the Lock button on the Encryption card. After locking the dataset, the icon on the tree table changes to locked, and the Unlock button shows on the Encryption card.
Before creating an encrypted pool (root dataset) or dataset, decide if you want to encrypt all child datasets, zvols, and data stored on that dataset.
If your system does not have enough disks to create a second storage pool, we recommend not using encryption at the pool level. Apply encryption at the dataset level to non-root parent or child datasets.
All pool-level encryption is key-based encryption. When prompted, download the encryption key and keep it stored in a safe place where you can back up the key file. You cannot use passphrase encryption at the pool level.
You cannot change an existing dataset from encrypted to unencrypted, but you can change the encryption type applied to a non-root dataset from key to passphrase or passphrase to key type.
Encrypting the root dataset (pool-level encryption) creates a single point of failure. Losing one key makes the entire pool inaccessible.
Best practice Do not enable encryption during pool creation. Instead, create an unencrypted pool with individually encrypted datasets and zvols. This allows independent key management, selective unlock, isolated failures, and simplified recovery.
Go to Storage and click Create Pool on the Storage Dashboard screen. Or click Add to Pool on the Unassigned Disks card and click Add to New to open the Pool Creation Wizard.
Enter a name for the pool, then select the Encryption. option you want to use. To encrypt the pool, select Software Encryption (ZFS). Proceed with the pool creation process. After clicking Create Pool on the Review screen, a warning dialog opens before the pool is created.
Read the warning, and acknowledge the warning to close the warning.
A second dialog opens where you click Download Encryption Key for the pool encryption key.
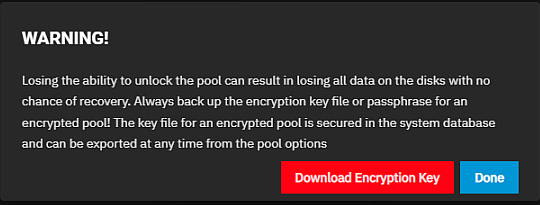
Click Done to close the window. Store the encryption key file in a safe location where it is backed up.
To add an encrypted dataset, go to Datasets.
Select a dataset in the tree table where you want to add a new dataset. The default dataset selected when you open the Datasets screen is the root dataset of the first pool on the tree table list. If you have more than one pool and want to create a dataset in a pool other than the default, select the root dataset for that pool or any dataset under the root where you want to add the new dataset.
Click Add Dataset to open the Add Dataset screen, and enter a name.
Select the Dataset Preset option you want to use.
Click Advanced Options and scroll down to the Encryption Options. If the parent dataset is unencrypted and you want to encrypt the new dataset, disable Inherit (non-encrypted) and show the Encryption option. If the parent dataset is encrypted, disable Inherit (encrypted) to show the current encryption configuration options inherited from the encrypted parent, which allows you to change the type of encryption applied to the new dataset, but it does not allow you to create the dataset with no encryption. To keep the dataset encryption settings from the parent, leave inherit selected.

Decide if you want to use the default key type encryption and want to let the system generate the encryption key leave Generate Key enabled. To use a key of your choice, disable Generate Key and enter the new key in the Key field. This shows Export Key on the Encryption card for the dataset after saving the dataset.
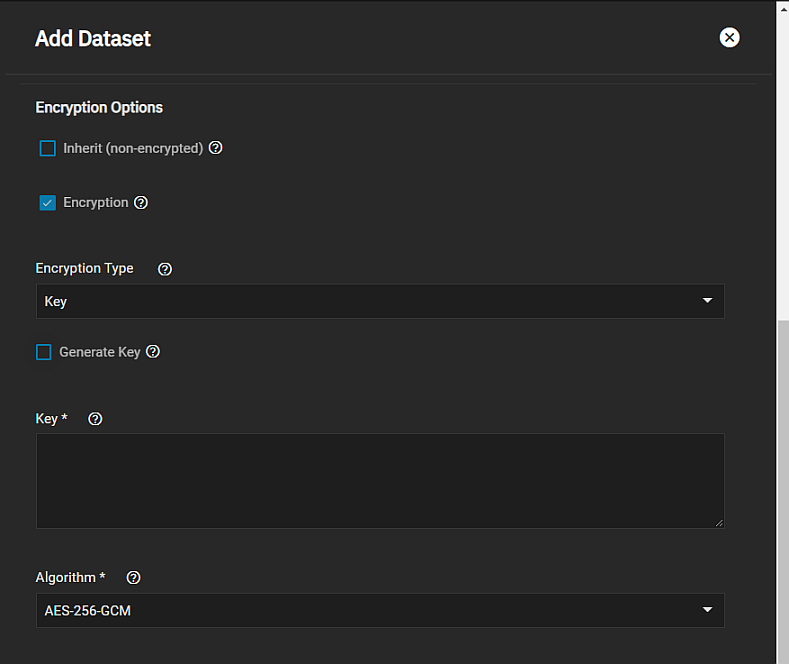
Change Encryption Type to Passphrase to use passphrase encryption. This shows the Lock option on the Encryption card for the dataset after saving the dataset.

The passphrase must be longer than 8 but less than 512 characters.
Keep encryption keys and/or passphrases safeguarded in a secure and protected place. Losing encryption keys or passphrases can result in permanent data loss!
Select the encryption algorithm from Algorithm or use the recommended default if you do not have a particular encryption standard you want to use.
You cannot add encryption to an existing dataset!
Before making changes to a locked encrypted dataset you must unlock it.
You can change the type of encryption for an already encrypted dataset using Edit on the Encryption card for the dataset.
Save changes to the encryption key or passphrase, update your saved passcodes and keys file, and back up that file.
To change the encryption type, go to Datasets, select the encrypted dataset on the tree table, then click Edit on the Encryption card. The Edit Encryption Options dialog for the selected dataset opens.
If the dataset inherits encryption settings from a parent dataset, first disable the Inherit encryption properties from parent option to show the current encryption options.
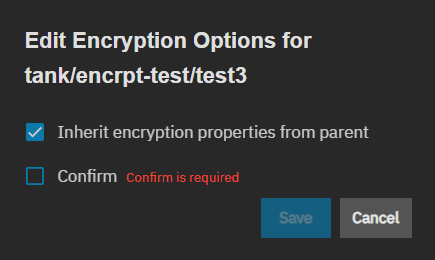
If the parent encryption type is key, you can change to passphrase encryption, but if the parent encryption inherited is passphrase, the Encryption Type setting is disabled, which means you cannot change from passphrase to key.
If set to key type you can choose to use the Generate Key or copy/paste a new random encryption key into the Key field.
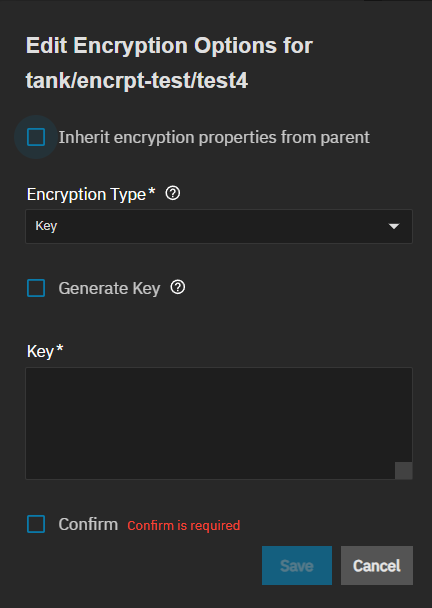
To change the passphrase for passphrase-encryption, enter a new passphrase in Passphrase and Confirm Passphrase.
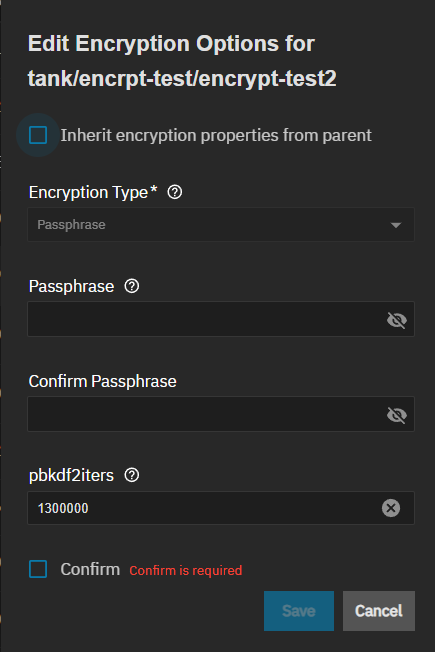
Use a complex passphrase that is not easy to guess. Store in a secure location subject to regular backups.
Leave the other settings at default, then click Confirm to activate Save.
Click Save to close the window. The Encryption card for the dataset updates to reflect the changes made.
You can only lock and unlock an encrypted dataset if it is secured with a passphrase instead of a key file. Before locking a dataset, verify that it is not currently in use.
Select the encrypted dataset on the tree table, then click Lock on the Encryption card to open the Lock Dataset dialog with the full path name for the dataset.
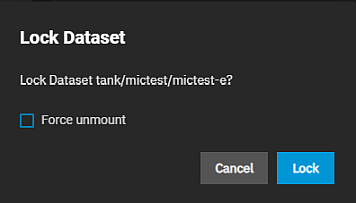
Use the Force unmount option only if you are certain no one is currently accessing the dataset. Force unmount boots anyone using the dataset (e.g. someone accessing a share) so you can lock it. Click Confirm to activate Lock, then click Lock.
You cannot use locked datasets.
To unlock a dataset, go to Datasets, then select the locked dataset on the tree table. Click Unlock on the Encryption card to open the Unlock Dataset screen.
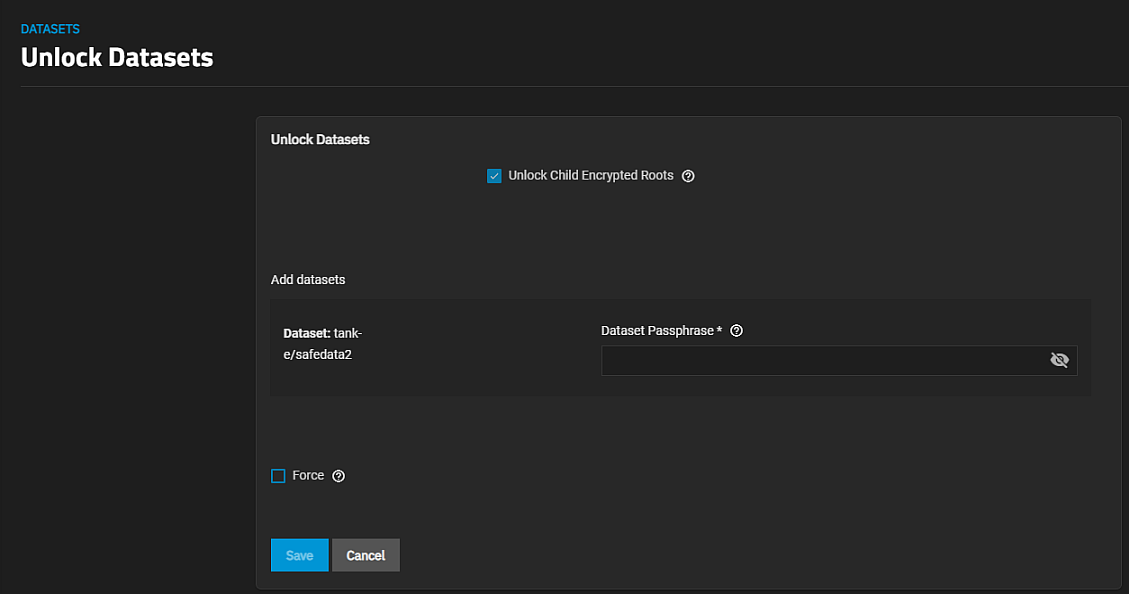
Enter the key if key-encrypted, or the passphrase into Dataset Passphrase and click Save.
Select Unlock Child Encrypted Roots to unlock all locked child datasets if they use the same passphrase.
Select Force if the dataset mount path exists but is not empty. The unlock operation fails when this happens. Using Force allows the system to rename the existing directory and file where the dataset should mount, which prevents the mount operation from failing. A confirmation dialog displays.
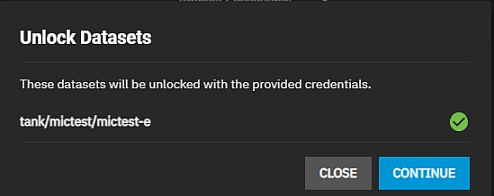
Click CONTINUE to confirm you want to unlock the datasets. Click CLOSE to exit and keep datasets locked. A second confirmation dialog opens confirming the datasets unlocked. Click CLOSE. TrueNAS displays the dataset with the unlocked icon.
Users are responsible for backing up and securing encryption keys and passphrases! Losing the ability to decrypt data is similar to a catastrophic data loss.
To encrypt a Zvol, select a parent dataset and then create a new Zvol. If the parent dataset is encrypted, select Inherit (encrypted) under Encryption Options. If the parent dataset is not encrypted, disable Inherit (non-encrypted), select Encryption, and then configure the Encryption Type and related settings.
Next, go to Datasets and click on the Zvol and locate the Encryption card.
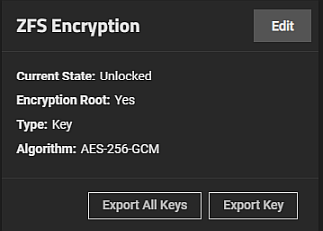
To change encryption properties from passphrase to key or enter a new key or passphrase, select the zvol, then click Edit on the Encryption card.
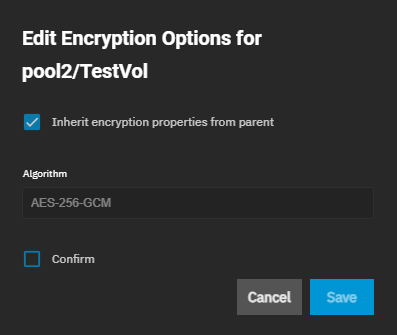
If Encryption Type is set to Key, type an encryption key into the Key field or select Generate Key. If using Passphrase, enter a passphrase of eight to 512 characters.Use a passphrase complex enough that is not easily guessed. After making any changes, select Confirm, and then click Save.
Save changes to the encryption key or passphrase, update your saved passcodes and keys file, and back up the file.
There are two ways to manage the encryption credentials: a key file or a passphrase. Creating a new encrypted pool automatically generates a new key file and prompts users to download it.
To manually back up a root dataset key file, click Export Key on the Encryption card.Always back up the key file to a safe and secure location.
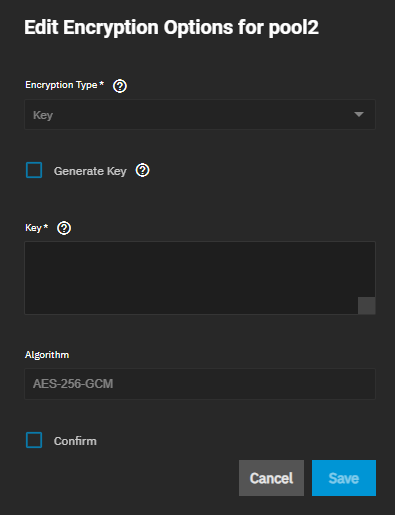
See Changing Dataset-Level Encryption for more information on changing encryption settings.
A passphrase is a user-defined string of at least eight characters in length, and it is required to decrypt the dataset. A passphrase is a user-defined string of eight to 512 characters that is required to decrypt the dataset. The pbkdf2iters is the number of password-based key derivation function 2 (PBKDF2) iterations to use for reducing vulnerability to brute-force attacks. Users must enter a number greater than 100000.
TrueNAS users should either replicate the dataset/Zvol without properties to disable encryption at the remote end or construct a special JSON manifest to unlock each child dataset/zvol with a unique key.
Replicate every encrypted dataset you want to replicate with properties.
Export key for every child dataset that has a unique key.
For each child dataset construct a proper json with poolname/datasetname of the destination system and key from the source system like this:
{"tank/share01": "57112db4be777d93fa7b76138a68b790d46d6858569bf9d13e32eb9fda72146b"}Save this file with the extension
.json . On the remote system, unlock the dataset(s) using properly constructed
json files.
Uncheck properties when replicating so that the destination dataset is not encrypted on the remote side and does not require a key to unlock.
Go to Data Protection and click ADD in the Replication Tasks window.
Click Advanced Replication Creation.
Fill out the form as needed and make sure Include Dataset Properties is NOT checked.
Click Save.
Go to Datasets on the system you are replicating from. Select the dataset encrypted with a key, then click Export Key on the ZFS Encryption widget to export the key for the dataset.
Apply the JSON key file or key code to the dataset on the system you replicated the dataset to.
Option 1: Download the key file and open it in a text editor. Change the pool name/dataset part of the string to the pool name/dataset for the receiving system. For example, replicating from tank1/dataset1 on the replicate-from system to tank2/dataset2 on the replicate-to system.
Option 2: Copy the key code provided in the Key for dataset window.
On the system receiving the replicated pool/dataset, select the receiving dataset and click Unlock.
Unlock the dataset. Either clear the Unlock with Key file checkbox, paste the key code into the Dataset Key field (if there is a space character at the end of the key, delete the space), or select the downloaded Key file that you edited.
Click Save.
Click Continue.