Edit page
TrueNAS CORETrueNAS CORE Nightly Development Documentation
This content follows experimental early release software. Pre-release software is intended for testing purposes only.
Use the Product and Version selectors above to view content specific to a stable software release.

Setting a Static IP Address for the TrueNAS UI

Disruptive Change

It is possible to make changes to the network interface that the web interface uses. But this can result in losing connection to the TrueNAS system! Very often fixing misconfigured network settings requires command line knowledge. Physical access to the system is often required as well.

Multiple interfaces connected to a single TrueNAS system cannot be members of the same subnet.

You can combine multiple interfaces with link aggregation (LAGG) or a network bridge. Alternatively, you can assign multiple static IP addresses to a single interface by configuring aliases.

Click for more information

When multiple network interface cards (NICs) connect to the same subnet, users might incorrectly assume that the interfaces automatically load balance. However, ethernet network topology allows only one interface to communicate at a time. Additionally, both interfaces must handle broadcast messages since they are listening on the same network. This configuration adds complexity and significantly reduces network throughput.

If you require multiple NICs on a single network for performance optimization, you can use a link aggregation (LAGG) configured with Link Aggregation Control Protocol (LACP). A single LAGG interface with multiple NICs appears as a single connection to the network.

While LACP is beneficial for larger deployments with many active clients, it might not be practical for smaller setups. It provides additional bandwidth or redundancy for critical networking situations. However LACP has limitations as it does not load balance packets.

On the other hand, if you need multiple IP addresses on a single subnet, you can configure one or more static IP aliases for a single NIC.

In summary, we recommend using LACP if you need multiple interfaces on a network. If you need multiple IP addresses, define aliases. Deviation from these practices might result in unexpected behavior.

For a detailed explanation of ethernet networking concepts and best practices for networking multiple NICs, refer to this discussion from National Instruments.

Process Summary

Configuring a static IP address involves both the TrueNAS web UI and the Console Setup menu.

  • Web UI
    • Network > Interfaces > Add or Edit
      • Type address into IP Address and select a subnet mask.
      • Add or Delete additional addresses as needed.
    • Test saved changes before permanently applying them.
      • Dialog asks to temporarily apply changes.
      • After you apply the network settings changes, they don’t immediately become permanent. You can choose the amount of time the new settings will work as temporary settings. After this designated amount of time, the new network settings become permanent if you save them. Saving the new network changes overwrites the previous configuration.
    • Network > Network Summary summarizes addressing information of every configured interface.
  • Console menu
    • Physical Interfaces: select Configure Network Interfaces (options are similar for other interface types)
      • Delete interface? enter or select n
      • Remove interface settings? enter or select n
      • Configure IPv4? enter or select y
        • Enter IP address and subnet mask
      • Configure IPv6 enter or select y
        • Enter IP address
      • Configure failover? enter or select n
    • Saving changes interrupts the web interface and could require a system reboot.

Setting Static IP Addresses

TrueNAS can configure physical network interfaces with static IP addresses. Use either the web interface or the system console menu.

The recommendation is to use the web interface for this process. There are extra safety features to prevent saving misconfigured interface settings.

Adding Static IP Addresses Using the Web Interface

Log in to the web interface and go to Network > Interfaces. This contains creation and configuration options for physical and virtual network interfaces.

Interfaces List
Figure 1: Interfaces List

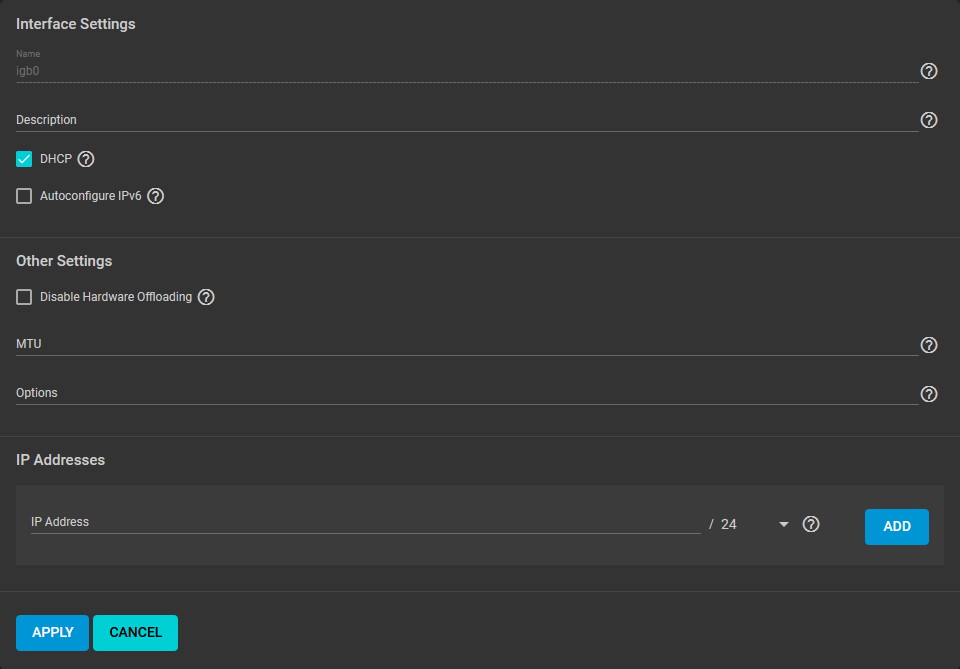
You can configure static IP addresses while creating or editing an interface.

To edit an active interface on TrueNAS Enterprise systems, you must first disable High Availability.
Editing an Interface
Figure 2: Editing an Interface

Type the desired address in the IP Address field and select a subnet mask.

Multiple interfaces cannot be members of the same subnet.

If an error displays when setting the IP addresses on multiple interfaces, check the subnet.

Use the buttons to Add and Delete more IP addresses as needed.

To avoid saving invalid or unusable settings, network changes are at first temporary. Applying any interface changes adds a dialog to the Network > Interfaces list.

Interface Changes Detected
Figure 3: Interface Changes Detected

You can adjust how long to test the network changes before they revert back to the previous settings. If the test is successful, another dialog allows making the network changes permanent.

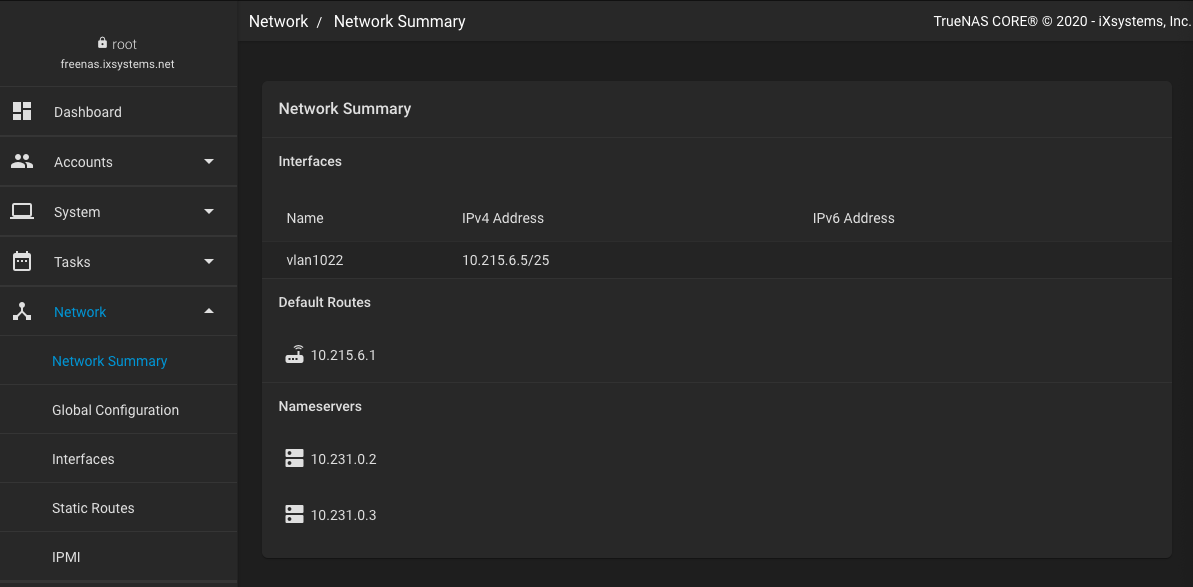
To view system networking settings, go to Network > Network Summary.

Network Summary
Figure 4: Network Summary

Using the System Console Menu to Assign Static IP Addresses to a Physical Interface

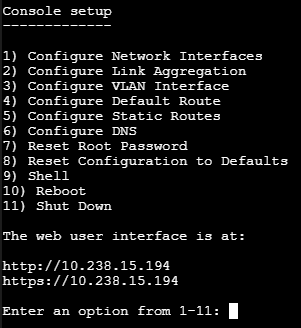
You need to have a monitor and keyboard attached to the system to use the console. If the system hardware allows it, you can connect with IPMI. The console menu displays after the system completes booting.

TrueNAS Console Setup Menu
Figure 5: TrueNAS Console Setup Menu

To add static IP addresses to a physical interface, go to Configure Network Interfaces. Other interface types have a similar process to add static IP addresses. Interfaces that are already configured for DHCP have that option disabled. There are many prompts to answer before you can add a static address. This example shows adding static IPv4 addresses to interface igb0:

Example
  Enter an option from 1-11: 1
  1) igb0
  2) igb1
  Select an interface (q to quit): 1
  Delete interface? (y/n) n
  Remove the current settings of this interface? (This causes a momentary disconne
  ction of the network.) (y/n) n
  Configure IPv4? (y/n) y
  Interface name:
  Several input formats are supported
  Example 1 CIDR Notation:
      192.168.1.1/24
  Example 2 IP and Netmask separate:
      IP: 192.168.1.1
      Netmask: 255.255.255.0, /24 or 24
  IPv4 Address:10.238.15.194/22
  Saving interface configuration: Ok
  Configure IPv6? (y/n) n
  Configure failover settings? (y/n) n
  Restarting network: ok
  Restarting routing: ok
Saving interface configuration changes disrupts the web interface while system networking restarts. The new settings might need a system reboot to take effect. If the web interface is unavailable, this could also require a reboot. Check if the network interface you changed is the one utilized by the web interface.